03 Dec 2022
Rust has two ways to store variables during runtime.
- Stack: It’s a faster way when you know the size of the variable.
- Heap: When you don’t know the size of the memory, this is slower because it will store a pointer in the stack and the memory in the heap. It also has to look for an empty space in the memory that will fit your variable.
Rules for ownership in Rust:
- Each value has an owner
- A value can only have one owner
- When the owner goes out of scope, the value is dropped
If you want to use the value from the heap in two variables you need to clone the same.
// This is not allowed
let s1 = String::from("Something");
let s2 = s1;
// In this case only s2 is valid, s1 will be dropped

// Now to use s1 and s2
let s1 = String::from("Something");
let s2 = s1.clone(); // This will clone the information from the stack and the heap into new values
This does not apply to values that only stay on the stack so you could do without having to use copy:
let string1 = "Something";
let string2 = string1;

let integer1 = 10;
let integer2 = integer1;
Ownership and Functions
When you pass a value that is in the heap to a function, that function will be the new owner of it. So you can’t continue using after calling it.
fn main() {
  let text = String.from("Something");
  println_something(text); // This will give ownership of text to print_something
  println!("{}", text); // This would not be valid because the value was dropped
}

fn print_something(text: String) {
  println!("{}", text);
}
This does not apply to values that only stay in the stack:
fn main() {
  let meaning = 42;
  println_something(meaning); // This makes a copy of the value in the stack
  println!("{}", meaning); // This would work normally
}

fn print_something(value: i32) {
  println!("{}", value);
}
Return Values
You can overcome the limitation of not being able to use a value anymore by returning the value, this will give the ownership to the caller of the function
fn main() {
  let text = String.from("Something");
  let other_text = println_something(text); // This will give ownership of text to print_something
  println!("{}", other_text); // This would not be valid because the value was dropped
}

fn print_something(text: String) -> String {
  println!("{}", text);
  text // without semicolon to return the value
}
References & Borrowing
Sometimes you want to use some value from the heap in a function but you don’t want to take ownership of it. Example:
fn main() {
    let s1 = String::from("hello");
    let (s2, len) = calculate_length(s1);
    println!("The length of '{}' is {}.", s2, len);
}

fn calculate_length(s: String) -> (String, usize) {
    let length = s.len(); // len() returns the length of a String
    (s, length)
}
For calculate_length you don’t want to take ownership of the string. In this case you just want to read the value and return the length. To solve this problem you can use a reference.
& is the symbol used for passing references
So after using a reference our function would be:
fn main() {
    let s1 = String::from("hello");

    let len = calculate_length(&s1);

    println!("The length of '{}' is {}.", s1, len);
}

fn calculate_length(s: &String) -> usize {
    s.len()
}
In Rust passing a reference is called Borrowing and it allows you to keep the ownership because when you passing a reference, you don’t transfer the ownership to the function. With Borrowing you can’t mutate values. So if you write
fn main() {
    let mut to_be_mutated = String::from("Hello");
    append_dot(&to_be_mutated);
    println!("{}", to_be_mutated);
}

fn append_dot(text: &String) {
    text.push_str(".");
}
The compiler will throw the following exception:
warning: variable does not need to be mutable
  --> src/main.rs:10:9
   |
10 |     let mut to_be_mutated = String::from("Hello");
   |         ----^^^^^^^^^^^^^
   |         |
   |         help: remove this `mut`
   |
   = note: `#[warn(unused_mut)]` on by default

error[E0596]: cannot borrow `*text` as mutable, as it is behind a `&` reference
  --> src/main.rs:28:5
   |
27 | fn append_dot(text: &String) {
   |                     ------- help: consider changing this to be a mutable reference: `&mut String`
28 |     text.push_str(".");
   |     ^^^^^^^^^^^^^^^^^^ `text` is a `&` reference, so the data it refers to cannot be borrowed as mutable

For more information about this error, try `rustc --explain E0596`.
You can’t mutate what you don’t own.
Mutable References
Rust does allow to have mutable references but it has a specific syntax for it.
&mut is used when you need a mutable reference
So we fix the previous example to allow mutable references.
fn main() {
    let mut to_be_mutated = String::from("Hello");
    append_dot(&mut to_be_mutated);
    println!("{}", to_be_mutated);
}

fn append_dot(text: &mut String) {
    text.push_str(".");
}
Now the code above would be working.
Mutable References has some limitations, you can’t borrow a mutable reference twice at the same time. So if you try the following piece of code:
fn main {
    append_text(&mut to_be_mutated, &mut to_be_mutated);
}

fn append_text(original: &mut String, appended: &mut String) {
    original.push_str(appended);
}
This piece of code will give the error when ran:
error[E0499]: cannot borrow `to_be_mutated` as mutable more than once at a time
  --> src/main.rs:14:37
   |
14 |     append_text(&mut to_be_mutated, &mut to_be_mutated);
   |     ----------- ------------------  ^^^^^^^^^^^^^^^^^^ second mutable borrow occurs here
   |     |           |
   |     |           first mutable borrow occurs here
   |     first borrow later used by call

For more information about this error, try `rustc --explain E0499`.
This limitation is how rust keep the language safe. This is to avoid data races at compile, since only one mutable reference can exist at any time. Rust also has check when you are using mutable and immutable references together. If you try to use them together the compiler will throw an error.
fn main {
    let mut mixed_type_values = String::from("Mixed Type Values");
    let s1 = &mixed_type_values;
    let s2 = &mixed_type_values;
    let s3 = &mut mixed_type_values;
    println!("Print vals: {}, {} and {}", s1, s2, s3);
}
error[E0502]: cannot borrow `mixed_type_values` as mutable because it is also borrowed as immutable
  --> src/main.rs:17:14
   |
15 |     let s1 = &mixed_type_values;
   |              ------------------ immutable borrow occurs here
16 |     let s2 = &mixed_type_values;
17 |     let s3 = &mut mixed_type_values;
   |              ^^^^^^^^^^^^^^^^^^^^^^ mutable borrow occurs here
18 |     println!("Print vals: {}, {} and {}", s1, s2, s3);
   |                                           -- immutable borrow later used here

For more information about this error, try `rustc --explain E0502`.
Now if you use the immutable values before, it will work, because those references don’t have any risk of being mutated before the usage.
fn main() {
    let mut mixed_type_values = String::from("Mixed Type Values");
    let s1 = &mixed_type_values;
    let s2 = &mixed_type_values;
    println!("Print vals: {} and {}", s1, s2);

    let s3 = &mut mixed_type_values;
    println!("Print val: {}", s3);
}
Check Non Lexical Lifetimes
Dangling References
A Dangling Reference is when you have a pointer referencing a memory address that was freed from memory. So, that pointer points to nothing. The following code creates a dangling reference:
fn main() {
    let reference_to_nothing = dangle(); // 3. Now we have a dangling reference
}

fn dangle() -> &String {
    let s = String::from("hello"); // 1. Create the value in memory

    &s // 2. returns the reference and free the value of s
}
The compiler will throw:
error[E0106]: missing lifetime specifier
  --> src/main.rs:45:16
   |
45 | fn dangle() -> &String {
   |                ^ expected named lifetime parameter
   |
   = help: this function's return type contains a borrowed value, but there is no value for it to be borrowed from
help: consider using the `'static` lifetime
   |
45 | fn dangle() -> &'static String {
   |                 +++++++

For more information about this error, try `rustc --explain E0106`.
The solution is quite easy, you just return the real value.
fn main() {
    let reference_to_s = dangle();
}

fn dangle() -> &String {
    let s = String::from("hello");
    s
}
In this case the ownership of s will be given to reference_to_s.
Rust will only allow one single mutable reference per time or multiple immutable references. This is how race conditions are avoided at compile time. The compiler also will not allow you to have invalid references.
Slice
Slices are a way to pass a reference of a subset of a collection. This new slice will behave like a new collection having the .len() and it’s 0 and last indexes to be in the beginning of the slice.
The syntax is quite simple:
let items = [0, 1, 2, 3, 4, 5, 6, 7, 8, 9, 10];
let slice = &items[0..3]; // This will be [0, 1, 2] the end index is exclusive
And you can do the same with strings:
fn main() {
    let items = [0, 1, 2, 3, 4, 5, 6, 7, 8, 9, 10];
    let first_half = &items[0..5];
    let second_half = &items[6..10];

    println!(
        "First Half - First Item: {}, Length: {}",
        first_half[0],
        first_half.len()
    );
    println!(
        "Second Half - First Item: {}, Length: {}",
        second_half[0],
        second_half.len()
    );

    let hello_world = "Hello, World!";
    let hello = &hello_world[0..5];
    let world = &hello_world[7..12];
    println!("This is {}, and this is {}", hello, world);
}
The code above would print:
First Half - First Item: 0, Length: 5
Second Half - First Item: 6, Length: 4
This is Hello, and this is World
Now imagine that you have to check if an element exists in a sorted array, you can use Binary Search for that. You start with an array, then you call the same method recursively on the left and right side. Usually you would have to pass the start and end indexes to it.
The implementation would end like this:
fn main() {
    let items = [0, 1, 2, 3, 4, 5, 6, 7, 8, 9, 10];
    let found = binary_search(&items, 3, 0, 11);
    println!("Is item 3 in the array? {}", found);
}

fn binary_search(items: &[i32], target: i32, start_index: usize, end_index: usize) -> bool {
  // Implementation hidden for obvious reasons
}
Now if we start using slices we can change the implementation to be
fn main() {
    let items = [0, 1, 2, 3, 4, 5, 6, 7, 8, 9, 10];
    let found = binary_search_with_slices(&items, 3);
    println!("Is item 3 in the array? {}", found);
}

fn binary_search_with_slices(items: &[i32], target: i32) -> bool {
  // Implementation hidden for obvious reasons
}
21 Jul 2020
AMIs and the Old Way
We all know how important Infrastructure as Code(IaC) is in a DevOps environment. The main reasons are that code is:
- Reproducible: We can run how many times we want and we are going to get the expected result, unlike manual changes automation won’t commit silly mistakes of forgetting to run a command.
- Versionable: We can version using git, track the changes and be able to use the same collaboration tools and techniques like Merge Requests and Review.
- Automated: Besides triggering you don’t have to do anything to get the infrastructure up and running.
In case your project isn’t following the latest trend and using something like serverless or Kubernetes there’s a big chance that you are using Virtual Machines, even if you are in the cloud. In this case, there are two kinds of tools for IaC in VM environments.
- Provisioning Tools: Those are the ones to create the infrastructure, like Terraform or CloudFormation.
- Configuration Management Tools: Which are the ones used to set up machines, deploy applications and configure them. We have many tools for that like Ansible, Chef, Puppet.
One of the issues that we have is time, after provisioning everything we have to install everything to the box, usually, it’s going to be multiple applications and runtimes to install beofre having anything running. During this process of installation something might fail due a dependency that isn’t available anymore, like a repository for apt that is missing or even a third party that is having connectivity issues.
Those applications/runtimes are less prone to change than your configurations or your applications. We can use pre-baked images but there’s a problem with that, the creation of pre-baked images is very manual, the process goes by:
- Instantiate new machine
- Install everything you need manually
- Create an image from it
You can have a configuration management tool to set up the box but the process still has a lot of space for manual error when picking the machine or doing anything else that you are not supposed to when installing the applications. Also, it’s hard to control when someone connects to the box and make a change without telling anyone. Those images also will get out-of-date quicky and the number of packages and that you will have to install and update during the deploy time will increase with time. That’s when Packer joins the game.
Packer
Packer comes to solve this kind of problem. It can build images for multiple cloud providers using Infrastructure as Code, by starting a new machine in your cloud provider and installing all the dependencies using your desired Configuration Manangent tool, and finally creating an image from the result, Packer can automate this process, leaving litter behind.
Anatomy of a Packer script
A packer script is composed by three main parts:
- Builders
- Provisioners
- Post-Processors
Builders
In the Builders, the part has declared the kind of machine that we want to create and the base image that you are going to use. In our case we are going to create an AMI for an instance in AWS, so we picked the amazon-ebs type which is the most common one.
amazon-ebs means that we are going to have a virtual machine backed by Elastic Block Storage, That’s Amazon’s hard drive service. Then some basic information so we can connect to aws and the base image that we are going to use.
In this case, we are using the source_ami_filter which searches all the public images in AWS. Filtering by the name, which accepts wildcards, the virtualisation type is set to hvm that is full hardware virtualisation, and an image that will use EBS as the main partition. To avoid bringing images from people we don’t know, the owners filter is set to a specific owner. Then most_recent so we can get an image with the latest patches. If you ever worked with Terraform you will notice that is the same idea in filtering with a slighting differ syntax from HCL.
In case you have a specific AMI you can use the source_ami option.
We have the instance_type which defines how powerful is the hardware and the user that we are going to use for ssh into the box.
{
    "variables": {
        "aws_access_key": "",
        "aws_secret_key": ""
    },
    "builders": [
        {
            "type": "amazon-ebs",
            "access_key": "",
            "secret_key": "",
            "region": "eu-west-2",
            "source_ami_filter": {
                "filters": {
                    "virtualization-type": "hvm",
                    "name": "ubuntu/images/hvm-instance/ubuntu-bionic-18.04-amd64-server--*",
                    "root-device-type": "ebs"
                },
                "owners": [
                    "099720109477"
                ],
                "most_recent": true
            },
            "instance_type": "t2.micro",
            "ssh_username": "ubuntu",
            "ami_name": "test-packer-"
        }
    ]
}
Provisioners
Now that the box is set, we have to install the applications and runtimes. To automate the installation we can use one of the Configuration Management tools that I have mentioned before, you also can use shell scripts or Powershell.
In this example, we are building a box to run Java applications. We want to have Java 11, Filebeat, Metricbeat and Chrony. To make more portable and to avoid installing anything else I’m using the shell provisioner, which is just regular shell commands. You give the type and the command to be executed. Packer will start an instance and SSH to it them execute those commands.
{
    "provisioners": [
        {
            "type": "shell",
            "inline": [
                "sleep 30"
            ]
        },
        {
            "type": "shell",
            "inline": [
                "sudo apt update -y",
                "sudo apt install -y chrony openjdk-11-jre-headless"
            ]
        },
        {
            "type": "shell",
            "inline": [
                "cd /tmp",
                "curl -L -O https://artifacts.elastic.co/downloads/beats/filebeat/filebeat-7.7.0-amd64.deb",
                "sudo dpkg -i filebeat-7.7.0-amd64.deb",
                "rm filebeat-7.7.0-amd64.deb"
            ]
        },
        {
            "type": "shell",
            "inline": [
                "cd /tmp",
                "curl -L -O curl -L -O https://artifacts.elastic.co/downloads/beats/metricbeat/metricbeat-7.7.0-amd64.deb",
                "sudo dpkg -i metricbeat-7.7.0-amd64.deb",
                "rm metricbeat-7.7.0-amd64.deb"
            ]
        }
    ]
}
Now it’s time to run and build the image.
More complex builds and Post-Processors
This is a very simple example, but we might be building images with complex dependencies for an application, for example at Bankable we had a box with a C++ application with quite a few dependencies to manage.
One of the ways to increase parity between dev and prod. is to have the same environment for both. Packer allows us to do that by having multiple builders, in this case, we can use the docker builder to generate an image with the same contents that the VM. We are using docker because it’s lighter and easier to handle locally, but you can pick any of the existing builders.
We add the image, a parameter with the base image, commit is set to true so we save the image, and the changes are to declare extra information that you can’t have in the provisioners. Like labels, exposing ports or setting the entry point or command.
{
    "variables": {
        "aws_access_key": "",
        "aws_secret_key": ""
    },
    "builders": [
        {
            "type": "amazon-ebs",
            "access_key": "",
            "secret_key": "",
            "region": "eu-west-2",
            "source_ami_filter": {
                "filters": {
                    "virtualization-type": "hvm",
                    "name": "ubuntu/images/hvm-instance/ubuntu-bionic-18.04-amd64-server--*",
                    "root-device-type": "ebs"
                },
                "owners": [
                    "099720109477"
                ],
                "most_recent": true
            },
            "instance_type": "t2.micro",
            "ssh_username": "ubuntu",
            "ami_name": "test-packer-"
        },
				{
            "type": "docker",
            "image": "ubuntu:18.04",
            "commit": true,
            "changes": [
                "LABEL mantainer.name='Andre Torres'",
                "EXPOSE 8080"
            ]
        }
    ]
}
Due ubuntu:18.04 container doesn’t have sudo and curl like the VM we are making a script to fix that, in case there’s no sudo installed in the box we install together with curl.
#! /bin/bash

if hash sudo 2>/dev/null; then
    echo "SUDO already present in the machine"
else
    apt-get update -y
    apt-get install -y sudo curl
fi
Then we change the provisioners part to add the script:
{
    "provisioners": [
        {
            "type": "shell",
            "inline": [
                "sleep 30"
            ]
        },
        {
            "type": "shell",
            "script": "./fix-sudo.sh"
        },
        {
            "type": "shell",
            "inline": [
                "sudo apt-get update -y",
                "sudo apt-get install -y chrony openjdk-11-jre-headless"
            ]
        },
        {
            "type": "shell",
            "inline": [
                "cd /tmp",
                "curl -L -O https://artifacts.elastic.co/downloads/beats/filebeat/filebeat-7.7.0-amd64.deb",
                "sudo dpkg -i filebeat-7.7.0-amd64.deb",
                "rm filebeat-7.7.0-amd64.deb"
            ]
        },
        {
            "type": "shell",
            "inline": [
                "cd /tmp",
                "curl -L -O curl -L -O https://artifacts.elastic.co/downloads/beats/metricbeat/metricbeat-7.7.0-amd64.deb",
                "sudo dpkg -i metricbeat-7.7.0-amd64.deb",
                "rm metricbeat-7.7.0-amd64.deb"
            ]
        }
    ]
}
The AMI and the container can be built now, but there’s still one problem. There isn’t any definition of the container repository or tag, we also have to push this container to a registry so other developers can use it. That’s were the post-processors enter.
We can add the docker-import to set the repository and the tag and docker-push to send the image to docker hub.
In both, we have the only tag to only run the post-processor for the docker builder.
{
		"post-processors": [
        [
            {
                "type": "docker-tag",
                "repository": "andretorrescodurance/packer_test",
                "tag": [
                    "0.1"
                ],
                "only": [
                    "docker"
                ]
            },
            {
                "type": "docker-push",
                "login": "true",
                "login_username": "andretorrescodurance",
                "login_password": "",
                "only": [
                    "docker"
                ]
            }
        ]
    ]
}
Passing variables
We need to pass the password for docker hub as a variable to packer when building the images. The variable is declared at the top of the file and we put as a sensitive-variable so the value isn’t printed in the STDOUT.
{
    "variables": {
        "aws_access_key": "",
        "aws_secret_key": "",
        "docker_hub_password": ""
    },
    "sensitive-variables": [
        "docker_hub_password"
    ],
		...
    "post-processors": [
        [
						...
            {
                "type": "docker-push",
                "login": "true",
                "login_username": "andretorrescodurance",
                "login_password": "",
                "only": [
                    "docker"
                ]
            }
        ]
    ]
}
Packer accepts JSON files with the variables declared, so we could create a file with the docker_hub_password
{
	"docker_hub_password": "password"
}
The final result is
{
    "variables": {
        "aws_access_key": "",
        "aws_secret_key": "",
        "docker_hub_password": ""
    },
    "sensitive-variables": [
        "docker_hub_password"
    ],
    "builders": [
        {
            "type": "amazon-ebs",
            "access_key": "",
            "secret_key": "",
            "region": "eu-west-2",
            "source_ami_filter": {
                "filters": {
                    "virtualization-type": "hvm",
                    "name": "ubuntu/images/hvm-ssd/ubuntu-bionic-18.04-amd64-server-*",
                    "root-device-type": "ebs"
                },
                "owners": [
                    "099720109477"
                ],
                "most_recent": true
            },
            "instance_type": "t2.micro",
            "ssh_username": "ubuntu",
            "ami_name": "packer-example-"
        },
        {
            "type": "docker",
            "image": "ubuntu:18.04",
            "commit": true,
            "changes": [
                "LABEL mantainer.name='Andre Torres'",
                "EXPOSE 8080"
            ]
        }
    ],
    "provisioners": [
        {
            "type": "shell",
            "inline": [
                "sleep 30"
            ]
        },
        {
            "type": "shell",
            "script": "./fix-sudo.sh"
        },
        {
            "type": "shell",
            "inline": [
                "sudo apt-get update -y",
                "sudo apt-get install -y chrony openjdk-11-jre-headless"
            ]
        },
        {
            "type": "shell",
            "inline": [
                "cd /tmp",
                "curl -L -O https://artifacts.elastic.co/downloads/beats/filebeat/filebeat-7.7.0-amd64.deb",
                "sudo dpkg -i filebeat-7.7.0-amd64.deb",
                "rm filebeat-7.7.0-amd64.deb"
            ]
        },
        {
            "type": "shell",
            "inline": [
                "cd /tmp",
                "curl -L -O curl -L -O https://artifacts.elastic.co/downloads/beats/metricbeat/metricbeat-7.7.0-amd64.deb",
                "sudo dpkg -i metricbeat-7.7.0-amd64.deb",
                "rm metricbeat-7.7.0-amd64.deb"
            ]
        }
    ],
    "post-processors": [
        [
            {
                "type": "docker-tag",
                "repository": "andretorrescodurance/packer_test",
                "tag": [
                    "0.1"
                ],
                "only": [
                    "docker"
                ]
            },
            {
                "type": "docker-push",
                "login": "true",
                "login_username": "andretorrescodurance",
                "login_password": "",
                "only": [
                    "docker"
                ]
            }
        ]
    ]
}
and we can run
packer build -var-file="/Users/andre/.packer-credentials.json" java-ami.json
Going further
The Amazon AMI and the Docker container have the same programs being installed right now, but do we need everything to be installed in the docker? We have filebeat, metricbeat, and chrony being installed in the container. We don’t need that for a local development environment. How can we fix that? Base Images.
First, let’s create a base image file and add those dependencies.
{
    "variables": {
        "aws_access_key": "",
        "aws_secret_key": ""
    },
    "builders": [
        {
            "type": "amazon-ebs",
            "access_key": "",
            "secret_key": "",
            "region": "eu-west-2",
            "source_ami_filter": {
                "filters": {
                    "virtualization-type": "hvm",
                    "name": "ubuntu/images/hvm-ssd/ubuntu-bionic-18.04-amd64-server-*",
                    "root-device-type": "ebs"
                },
                "owners": [
                    "099720109477"
                ],
                "most_recent": true
            },
            "instance_type": "t2.micro",
            "ssh_username": "ubuntu",
            "ami_name": "base-image-example-"
        }
    ],
    "provisioners": [
        {
            "type": "shell",
            "inline": [
                "sleep 30"
            ]
        },
        {
            "type": "shell",
            "inline": [
                "sudo apt-get update -y",
                "sudo apt-get install -y chrony"
            ]
        },
        {
            "type": "shell",
            "inline": [
                "cd /tmp",
                "curl -L -O https://artifacts.elastic.co/downloads/beats/filebeat/filebeat-7.7.0-amd64.deb",
                "sudo dpkg -i filebeat-7.7.0-amd64.deb",
                "rm filebeat-7.7.0-amd64.deb"
            ]
        },
        {
            "type": "shell",
            "inline": [
                "cd /tmp",
                "curl -L -O curl -L -O https://artifacts.elastic.co/downloads/beats/metricbeat/metricbeat-7.7.0-amd64.deb",
                "sudo dpkg -i metricbeat-7.7.0-amd64.deb",
                "rm metricbeat-7.7.0-amd64.deb"
            ]
        }
    ]
}
With the base image ready we can change the current file to use the base image, we change the source_ami_filter to pick the latest base-image-example-* (don’t forget to update the owners field). Then remove the programs that were previously installed.
{
    "variables": {
        "aws_access_key": "",
        "aws_secret_key": "",
        "docker_hub_password": ""
    },
    "sensitive-variables": [
        "docker_hub_password"
    ],
    "builders": [
        {
            "type": "amazon-ebs",
            "access_key": "",
            "secret_key": "",
            "region": "eu-west-2",
            "source_ami_filter": {
                "filters": {
                    "virtualization-type": "hvm",
                    "name": "base-image-example-*",
                    "root-device-type": "ebs"
                },
                "owners": [
                    "<owner_id>"
                ],
                "most_recent": true
            },
            "instance_type": "t2.micro",
            "ssh_username": "ubuntu",
            "ami_name": "packer-example-"
        },
        {
            "type": "docker",
            "image": "ubuntu:18.04",
            "commit": true,
            "changes": [
                "LABEL mantainer.name='Andre Torres'",
                "EXPOSE 8080"
            ]
        }
    ],
    "provisioners": [
        {
            "type": "shell",
            "inline": [
                "sleep 30"
            ]
        },
        {
            "type": "shell",
            "script": "./fix-sudo.sh"
        },
        {
            "type": "shell",
            "inline": [
                "sudo apt-get update -y",
                "sudo apt-get install -y openjdk-11-jre-headless"
            ]
        }
    ],
    "post-processors": [
        [
            {
                "type": "docker-tag",
                "repository": "andretorrescodurance/packer_test",
                "tag": [
                    "0.1"
                ],
                "only": [
                    "docker"
                ]
            },
            {
                "type": "docker-push",
                "login": "true",
                "login_username": "andretorrescodurance",
                "login_password": "",
                "only": [
                    "docker"
                ]
            }
        ]
    ]
}
Wrapping up
We spoke about the importance of Infrastructure As Code and why pre-baked images used to be a bad idea. Packer comes to help the creation of pre-baked images for many platforms speeding up the time to set up new environments. Since Packer is a IaC tool you can add to your CI/CD pipeline and automate and integrate with many things, like adding the new AMI Id to the Auto-Scalling Group in Amazon.
Then we went through on how to use Packer to create an image to Amazon and Docker and how to structure our files to avoid waste when build the images.
31 Mar 2020
We already spoke about the different type systems and how they work here, now it’s time to write some code and see
how type can help us.
The Flight Search Example
Imagine that we are building a company that searches for flights on multiple websites. We are exposing an endpoint that accepts JSON. Right now we are only dealing with simple searches where all flights will have a return and the accepted JSON is:
{
    "startDate": "10/11/2019",
    "endDate": "15/11/2019",
    "origin": "LHR",
    "dest": "DUB"
}
Now that we receive that request, we have to understand what composes a search:
- The start and end dates
- The start date has to be earlier than the end date.
- An origin and destination
- The origin and the destination must be different.
- The origin and the destination must be valid IATA
We can have all those validations without creating a class. Imagine that we have a controller that will receive that, parse the JSON, and send to a service.
The code for the application is:
    public class FlightSearchController {

    	private SearchService searchService;

    	public FlightSearchController(SearchService searchService) {
    		this.searchService = searchService;
    	}

    	public List<Flight> searchFlights(String searchRequest) {
    		JsonObject searchObject = parseJson(searchRequest);
    		return searchService.findFlights(
    			searchObject.get("startDate").asText(),
    			searchObject.get("endDate").asText(),
    			searchObject.get("origin").asText(),
    			searchObject.get("dest").asText());
    	}
    }
class SearchService {

    public List<Flight> findFlights(String startDate, String endDate, String origin, String dest) {
        return searchRepository.findFlights(startDate, endDate, origin, dest);
    }
}
class SearchRepository {

    public List<Flight> findFlights(String startDate, String endDate, String origin, String dest) {
        // implementation
    }
}
There are so many smells in that snippet that made me sick. Jokes aside we have to see that we are moving all the validations to the edge of the application, this will only blow up when we make a database call with invalid parameters. This might be a problem for error handling because we want to tell the person that called the API which kind of error is, a database problem would usually be a 5XX, but in reality, could be a 4XX since the problem is in the payload that was sent, not in the database.
Fastening the type seatbelt
There are two types of validations that have to be done in this part:
- Application validations: It’s related to the JSON and checking if all the values are parseable to the proper type.
- Business validations: See if the data will comply with the business rule like the starting date being before than the ending date.
Let’s start with the dates, there are not multiple date formats and isn’t a problem that we face frequently. Parsing the startDate and endDate parameters to LocalDate in the SearchService will help us to always have a valid date when searching in the database. In case an invalid date is sent a DateTimeException exception will be thrown, which makes easier to identify that is a problem with the data and not the database.
class SearchService {

    public List<Flight> findFlights(String startDate, String endDate, String origin, String dest) {
        LocalDate flightStartDate = parseDate(startDate);
        LocalDate flightEndDate = parseDate(endDate);
        return searchRepository.findFlights(flightStartDate, flightEndDate, origin, dest);
    }
}
    class SearchRepository {

    		public List<Flight> findFlights(LocalDate startDate, LocalDate endDate, String origin, String dest) {
    			// implementation
    		}
    }
class DateTimeFormatter {

    private static LocalDate parseDate(String date) {
        DateTimeFormatter formatter = DateTimeFormatter.ofPattern("dd/MM/yyyy");
        return LocalDate.parse(date, formatter);
    }

}
Now with the parser being done in the service we replace exceptions related to our database for DateTimeParseException, this makes it way easier to capture the right exception instead of trying to figure it out what was happening. What we have now is better than the previous code using strings all around but we can and must do better. The SearchService is throwing DateTimeParseException and we can handle that case in the controller and return something like 400 - Bad Request.
Now let’s take care of the IATA, the IATA specification (source: Wikipedia, I didn’t read the specification) says that’s a code composed by three letters. In this case, we can create a class for it and add the validation.
class InvalidIATAException extends InvalidArgumentException {}
class IATA {

    public final String iata;

    public IATA(String iata) {
        if (iata.length() != 3) {
            throw new InvalidIATAException();
        }
        this.iata = iata;
    }
}
Then we change the service and the repository to start using types:
class SearchService {

    public List<Flight> findFlights(String startDate, String endDate, String origin, String dest) {
        LocalDate flightStartDate = parseDate(startDate);
        LocalDate flightEndDate = parseDate(endDate);
        IATA originAirport = new IATA(origin);
        IATA destAirport = new IATA(dest);
        return searchRepository.findFlights(flightStartDate, flightEndDate, origin, dest);
    }
}
class SearchRepository {

    public List<Flight> findFlights(LocalDate startDate, LocalDate endDate, IATA origin, IATA dest) {
        // implementation
    }
}
With those changes, we can at least guarantee that the dates passed to the database are valid and the formatting doesn’t matter much at this point now because it’s encapsulated inside of a class. We can’t confirm that the date exists in the database but there won’t be any exceptions thrown when the query is executed.
Just a clarification, The Application Layer is the part that handles the communication, in this case, it would be the controller. The controller isn’t related to the business but just a way of input/output for our domain. This diagram shows the boundaries between them:

We use types, dependency injection and interfaces to abstract what the application is doing. The FlightSearchService doesn’t care if the data is coming through HTTP, RPC or even a CLI. The same goes for the FlightSearchRepository, it just cares that you can store and retrieve the data later, the how doesn’t matter for the business, that’s an application responsibility.
Continuing with the changes. The problem with the codebase is that it’s being filled with application code that isn’t relevant. The solution for that is moving that code up the application layer.
class SearchService {

    public List<Flight> findFlights(LocalDate startDate, LocalDate endDate, IATA origin, IATA dest) {
        return searchRepository.findFlights(flightStartDate, flightEndDate, origin, dest);
    }
}
public class FlightSearchController {

    private SearchService searchService;

    public FlightSearchController(SearchService searchService) {
        this.searchService = searchService;
    }

    public ResponseEntity<List<Flight>> searchFlights(String searchRequest) {
        JsonObject searchObject = parseJson(searchRequest);

        try {
            LocalDate flightStartDate = parseDate(searchObject.get("startDate").asText());
            LocalDate flightEndDate = parseDate(searchObject.get("endDate").asText());
            IATA originAirport = new IATA(searchObject.get("origin").asText());
            IATA destAirport = new IATA(searchObject.get("dest").asText());
        } catch (DateTimeParseException | InvalidIATAException e) {
            return ResponseEntity.status(400).build();
        }

        var flights = searchService.findFlights(flightStartDate, flightEndDate, originAirport, destAirport);
        return ResponseEntity.body(flights).build();
    }
}
Now the SearchService is free from any code that isn’t related to our business domain, if you want to test you will not have to worry about passing things that will be parsed to the proper classes and testing if the parsing is working, if you create anything else than a LocalDate compiler will tell you and if the parsing of the string to the LocalDate type fails you get an exception even before calling the service.
All those things that I’ve said here aren’t made up shit that I’m coming to try to look smart, they are code smells that many other people have written about before. The name of the code smell that we just changed is Primitive Obsession, it’s a code smell were you use primitive types to deal with things that should be abstracted as an object.
Throwing Exception where, when, how?
We already mentioned the Domain and the Application layer, where should we be adding the validation for the values that we have. For things like parsing dates or a JSON which is explicit out of the business domain, it’s better to make them live inside the Application Layer so we can test the Business Layer without having to worry about that, also the way we drive the application might be different depending on what you want. That isn’t something that our Business should be worried about.
Abstracting your way out of problems
Let’s start work on that to add some more types and safety to our search. Remember what I said at the beginning about not being able to hold too many things in my memory? We have this problem here, we have the business concept of search parameters but in the code, this isn’t mentioned at all. When you talk to someone that isn’t a developer they will say about the search parameter and you have to associate that to a specific group of fields and rules that are distributed around the codebase.
What happens if we add another field? You have to memorize that but what if you were on holidays when they did that change, you probably are going to have conversations were your knowledge is out of date. It’s possible to fix that using types to abstract the complexity and defer the need to know certain information to the last second.
Let’s start refactoring our code, the first thing we can change are the dates, we always need a start date and an end date. Passing them around would be easier if they were always together wouldn’t?
public class DateRange {

    final LocalDate start;
    final LocalDate end;

    public DateRange(LocalDate start, LocalDate end) {
        this.start = start;
        this.end = end;
    }
}
public class FlightSearchController {
    //...
    public ResponseEntity<List<Flight>> searchFlights(String searchRequest) {
        JsonObject searchObject = parseJson(searchRequest);

        try {
            LocalDate flightStartDate = parseDate(searchObject.get("startDate").asText());
            LocalDate flightEndDate = parseDate(searchObject.get("endDate").asText());

            DateRange dateRange = new DateRange(flightStartDate, flightEndDate);

            IATA originAirport = new IATA(searchObject.get("origin").asText());
            IATA destAirport = new IATA(searchObject.get("dest").asText());
        } catch (DateTimeParseException | InvalidIATAException e) {
            return ResponseEntity.status(400).build();
        }
        //...
    }
}
public class SearchService {

    public List<Flight> findFlights(DateRange dateRange, IATA origin, IATA dest) {
        return searchRepository.findFlights(dateRange.start, dateRange.end, origin, dest);
    }
}
We can go even further and add some kind of validation in the date range because we don’t want the start date to be after the end date, this could cause all sorts of problems.
public class IllegalDateRange extends InvalidArgumentException {}
public class DateRange {

    final LocalDate start;
    final LocalDate end;

    public DateRange(LocalDate start, LocalDate end) {

        if (start.isAfter(end)) {
            throw new IllegalDateRange();
        }

        this.start = start;
        this.end = end;
    }
}
Now it’s way harder to represent an invalid date range in the system (not impossible tho).
Now we just need a final type for our search with all those fields that we are passing around.
public class SearchParameters {

    final DateRange dateRange;
    final IATA origin;
    final IATA destination;

    public SearchParameters(DateRange dateRange, IATA origin, IATA destination) {
        this.dateRange = dateRange;
        this.origin = origin;
        this.destination = destination;
    }
}
public class FlightSearchController {
    //...
    public ResponseEntity<List<Flight>> searchFlights(String searchRequest) {
        JsonObject searchObject = parseJson(searchRequest);

        try {
            LocalDate flightStartDate = parseDate(searchObject.get("startDate").asText());
            LocalDate flightEndDate = parseDate(searchObject.get("endDate").asText());

            DateRange dateRange = new DateRange(flightStartDate, flightEndDate);

            IATA origin = new IATA(searchObject.get("origin").asText());
            IATA destination = new IATA(searchObject.get("dest").asText());
            SearchParameters searchParameters = new SearchParameters(dateRange, origin, destination);
        } catch (DateTimeParseException | InvalidIATAException e) {
            return ResponseEntity.status(400).build();
        }

        var flights = searchService.findFlights(searchParameters);
        return ResponseEntity.body(flights).build();
    }
}
public class SearchService {

    public List<Flight> findFlights(SearchParameters searchParameters) {
        return searchRepository.findFlights(searchParameters);
    }
}
class SearchRepository {

    public List<Flight> findFlights(SearchParameters searchParameters) {
        // implementation
    }
}
All those changes that were made focused in removing a code smell called Data Clumps.
NullPointerException at com.blogpost.Chapter (chapter.java:32)
Everyone is a close friend of nulls, from bankrupting companies to making devs drink under their desks, they are everywhere. Inevitable like making bad decisions when you are drunk, we need to deal with nulls.
Is null a type or the lack of types? With that philosophical question that doesn’t matter, sometimes we need to represent that a call don’t have anything to return. When getting an environment variable, for example, that variable might not be declared and we represent that as a null.
This is not a problem, what can cause harm is the fact that the null might not be noticed or dealt before the values are used.
For example:
public class NullExample {
    public static void main(String[] args) {
        String home = System.getenv("HOME");
        System.out.println(home.length());
    }
}
This snippet will throw a NullPointerException but at any moment we were warned that the method would return null, we might know for reading the documentation or the code. We can add a null check before calling home.length(), that solves the problem of the exception that we are getting, we still have the problem that we have to do that after every call of the method, and human beings are unreliable to do repetitive tasks like that. Do you know who is good checking that kind of stuff? The compiler of course.
With all the advances in modern society and Java, there’s a quite decent way of dealing with this problem. Java provides us with the Optional<> that can wrap null values for us. The main advantage of using an Optional is that we can’t use the value straight away (please, don’t call .get() straight away), we explicitly have to deal with the possibility of a null value. This is way better than returning null or just throwing an exception. The final result would be:
public class OptionalExample {
    public static void main(String[] args) {
        Optional<String> home = Optional.ofNullable(getenv("HOME"));
        home.ifPresent(System.out::println);
    }
}
You can use Optional to represent when a query doesn’t have any result like in our flight search system. The optional is used to represent the fact that a flight number does not exist.
class SearchRepository {
    public Optional<Flight> flightById(FlightId id) {
        // implementation
    }
}
Incoming parameters
Optional does the work when we have to represent that a function might return a null value. What if we need to ensure that all parameters are valid, how do we do that?
Sometimes we are limited by what our tools can do, when this happens means that we have to do the extra work to compensate that or to get better tools, in this case, we have Kotlin, which comes with Non-Nullable types and some other nice tricks.
Before starting talking about Kotlin, I want to make clear that if you are using Java properly and taking care with what you call you are not going to have too many NullPointerException problems, the best way is to know the language API and the libraries you work with.
Non-Nullable Types
One of the main features of Kotlin is the fact that regular types can’t be null. You can’t assign null to a value, neither return null from a function UNLESS you use a Nullable type, which is different.
Back to our search application, imagine that we were using Kotlin since the beginning, the DateRange class would be something like this:
data class DateRange(val start: LocalDate, val end: LocalDate)
Now we have new requirements, we need to start to sell one round trip, this means that we will only have the start for the date range. In Kotlin this would translate to:
data class DateRange(val start: LocalDate, val end: LocalDate?)
The difference seems minimal but the ? in the end field change how we use the field. A Nullable Type in Kotlin would the equivalent of an Optional in Java with the difference that in the start the compiler will not allow null values.
data class DateRange(val start: LocalDate, val end: LocalDate?)

fun main() {
    println(DateRange(LocalDate.now(), LocalDate.now())) // DateRange(start=2020-01-26, end=2020-01-26)
    println(DateRange(LocalDate.now(), null)) // DateRange(start=2020-01-26, end=null)
    println(DateRange(null, LocalDate.now())) // Does not compile
}
With that, we can truly enforce that we are not passing null values as parameters for our functions.
Sealed Classes and the when keyword
We already spoke about exceptions and where to put them. The things is: Exceptions are quite abruptly and violent. You don’t return exceptions, you throw them at the face of the method that called you, and to add insult to the injury you print a really long stack trace to be sure that the person sees what you just did.
Drama and pettiness aside exceptions are not explicit and in the case of unchecked exceptions, it’s really hard to keep track of them all. They are used as a way to express when something goes wrong with your system and that’s why they look different from the regular flow validations and returning certain invalid states are in many cases represented as exceptions. In a language like Java, that’s the convention and there are not many tools that help to overcome that.
Going back to our company, we have to add business validation now. The origin can’t be the same one as the destination, if this happens we have to return the status code 412.
public class OriginAndSourceEqualsException extends Exception {}

public class FlightSearchController {
    //...
    public ResponseEntity<List<Flight>> searchFlights(String searchRequest) {
        //...

        try {
            var flights = searchService.findFlights(searchParameters);
        } catch (OriginAndSourceEqualsException e) {
            return ResponseEntity.status(412).build();
        }

        return ResponseEntity.body(flights).build();
    }
}
This code doesn’t look too bad, but what if we start do add more validations with different status code? we are going to have to add more and more catch clauses, if we have to implement the catch in multiple places, how can we be sure that we are not forgetting anything? In Java, the compiler doesn’t do exhaustive checks. This is when we use Sealed Classes and the when clause.
Sealed Class is a construct that allows you to create restricted hierarchies, other people will not be able to extend from the outside of sealed classes. They are like a powerful version of an Enum, we can use a sealed class to represent the result of our search.
class SearchResult {
    class Success(val flights: List<Flight>)
    class Invalid(val message: String)
}

class FlightSearchController {
    //...
    ResponseEntity<List<Flight>> searchFlights(String searchRequest) {
        //...

        val result = searchService.findFlights(searchParameters);
        return when(result) {
            is SearchResult.Success -> ResponseEntity.body(result.flights).build()
            is SearchResult.Invalid -> ResponseEntity.status(412).build()
        }
    }
}
Combined with the keyword when the Kotlin compiler forces you to check all the possibilities for the sealed class or to be a generic else that take cares of the parent sealed class.
Immutable Types. Tell Don’t Ask, and things that don’t have a section for itself.
Something that all the code snippets above has is that they all use final or val, that’s because we want to make the fields immutable and avoid the mutation of the internal state in an object, exposing setters and allowing people to change the value of the fields can cause our objects to break, instead of that if we are using Immutable Types you have to instantiate a new class going through the validations again. Search about Value Objects if you want to know more about that.
In case you need to mutate the state of the object you have to follow some principles like Tell Don’t Ask and good principles of OO, the main thing is to avoid exposing the internal of a class, a good example is adding to a list, never expose the list so people can add items to it, instead provide a method to add to the list.
// Bad
items.getList().add(item)

// Good
items.add(item)
You should also search for the methods of your language that are immutable, like in Java the Instant method is immutable but LocalDate doesn’t.
During the examples, there were also many constructors with validations and more code than the usual, if you are doing that a lot you should totally learn about Static Factories that are mentioned in Effective Java, it will teach you how to write more idiomatic constructors for your classes.
There’s also Inline classes, that’s something that is coming to the next version of Kotlin and to some future version in Java. When you need to wrap a single value like an Id. I will not give any examples but you can check those two sources for Kotlin and Java.
Sources
25 Feb 2020
I’ve said quite a few times that I like static typing, but to be honest, I’m probably not the most knowledgeable person around using typing and I wanted to change that. What’s going to be the point of this post?
I will present some different type systems, provide some examples of how we can use types to solve some code smells, and give more safety to our codebase.
Why do I like types?
Usually, I’m not the smartest person in the room, most of the time I’m at the bottom of the list. A short summary of things I can’t remember are:
- Remember the return type for that method that I just created.
- Remember all the places that I have to change something because of some refactoring, like adding a new field to a constructor.
- Keep track of multiple variables in my head while trying to memorize their types, e.g: multiple fields that you have to pass for a method.
Just like the monkeys from 2001: A Space Odyssey, I know how to use tools and how to write better code. I try to rely on every tool, automation and check that is provided, and we have many things in that area, like compilers, unit tests and static code analysis.
Now I’m going to focus on types, but before that let’s go through the basics of type systems, so we have context and I can make this post longer to give the false impression that I’m smart and I really understand type systems.
The different flavours of Type Systems
Type systems can go from very relaxed and they will try to make things work with everything you give to them to very strict and rigid not allowing your type shenanigans.
Dynamic Typing
In dynamically typed languages, you don’t have much enforcement on the types that you pass around. You don’t have to say which type you want to return or to pass in the parameters. However, that doesn’t mean that you should pass anything if you try to call a method or field that doesn’t exist your code will break, but besides that, it doesn’t matter much.
function printText(text) {
    console.log(text);
}
See the method above, it has zero enforcement that will receive or return, it will just print to the console, and that’s how dynamically typed languages work. Variables have their types assigned at runtime at the moment you pass the value, you don’t have to worry with that beforehand.
When talking about Dynamic Typed languages you have to understand that dynamically typed languages might have different ways of dealing with typecasting; the more permissive ones are called Weakly-Typed, an example of this is JavaScript (no hate please. Just dropping facts).
Weak Typing
This is the more relaxed version of typing that you can find. Usually the interpreter will try to make some conversions in the types so the operations can be done. Let’s try to do some calculations with JavaScript:
    1 + 1   // 2
    "1" + 1 // "11"
    1 + "1" // "11"
    1 - "1" // 0
    "1" - 1 // 0
The first result is obviously right, but why do we get “11” when we try to sum a string with an integer? Under the hood the JavaScript engine is casting the other value to make the operation successful, instead of throwing an error the integer is transformed into a string and concatenated to the other string, the same thing for the third operation.
So why are the last two done over the integer value? In JavaScript, strings have the + operator but not the -, so to not throw an error the interpreter cast the string value to an integer that has the minus operation.
The main thing with Weak Typed systems is that they give preference to casting values and trying to make the operation happen instead of throwing an error, doesn’t mean that they will do the operation 100% of the time, but at least they will try.
Strong Typing
Let’s try to do that in another dynamic language like Ruby and see what’s going to happen:
1 + 1   // 2
"1" + 1 // TypeError (no implicit conversion of Integer into String)
1 + "1" // TypeError (String can't be coerced into Integer)
1 - "1" // TypeError (String can't be coerced into Integer)
"1" - 1 // NoMethodError (undefined method `-' for "1":String)
Now we only have one operation working and two different errors for the rest. From the second to the fourth operation we got TypeError, which is Ruby’s way to say that the types are different and that operation is wrong. The last error is saying that - isn’t a valid method for a String.
Throwing all those errors make Ruby less of a dynamically typed language? Of course not, we can see that the function that we wrote in JavaScript will be the same thing in Ruby:
def print_text(text)
    puts text
end
We still enforce neither parameter nor return type, but what Ruby does is try to be more conservative with castings, when an operation doesn’t sound right Ruby will throw an error instead of trying to make the operation happen.
Static Typing
Leaving the land of Dynamic Typed languages and getting into a more strict place, we have static types. Probably everyone is familiar with at least one static language like Java, C#, C++, C, Delphi, and many others.
When dealing with Static Typing we have to be more explicit about our intentions, we need to let people know what we are expecting and what we are giving them back, it’s like a contract. When we reproduce the same code we did for Ruby and JavaScript in Java we get:
public void printText(String text) {
    System.out.println(text);
}
We have to inform you that we are going to receive a String and that we don’t return anything from that method, in case we try to violate that contract the are going to have problems with the compiler. We try to compile the program calling the method with a different type and we get a compilation error.
public class Main {

    public static void printText(String text) {
        System.out.println(text);
    }

    public static void main(String[] args) {
        printText(123);
    }
}
Main.java:10: error: incompatible types: int cannot be converted to String
        printText(123);
                    ^
Now we moved the runtime errors that we were having in Ruby to the compilation time, the compiler is a safety net but isn’t fail-proof we still can get runtime errors by doing weird casting in runtime:
public class Main {
    public static void main(String[] args) {
        System.out.println(1 + Integer.parseInt("WAT"));
    }
}
This piece of code will compile without any problem, we are satisfying all the boundaries in the type system but when we run everything breaks.
Exception in thread "main" java.lang.NumberFormatException: For input string: "WAT"
    at java.base/java.lang.NumberFormatException.forInputString(NumberFormatException.java:65)
    at java.base/java.lang.Integer.parseInt(Integer.java:652)
    at java.base/java.lang.Integer.parseInt(Integer.java:770)
So keep that in mind, even with the safety of a compiler we can’t be 100% that our code is right.
So static types are better than dynamic ones?
Well, not exactly. Compile-time check gives you a guard rail against some problems. Having said that, relying on types purely to avoid problems isn’t the best way to go, even with statically typed languages you are bound to commit mistakes like the one shown previously.
The Ruby and Rails community uses unit testing to solve the lack of the compile enforcement but you still need to test your code for runtime exceptions, static languages will not need all this coverage but you still need to test for edge cases in the input and nulls.
The kind of project that you are doing is also something important when deciding between static or dynamic types. In case you are prototyping something and want to move fast a language that forces you to take care of all cases might not be the best, but it will shine in mission-critical applications that shouldn’t crash.
One of the main reasons to use a statically typed language is to try and catch bugs earlier. It is quite well known that the earliest we catch bugs/problems, the cheaper it is to fix them, if you never heard about that you can read more about that here.
Types and abstractions
Remember the reasons that I mentioned earlier? One way to avoid those problems is to abstract those problems in a way that we can easily reason with simple terms and force them to tell us what they mean.
There are many ways to create the same abstraction, we can use different types and end up having the same result.
For example in Ruby we can create a struct to store values for us:
Customer = Struct.new(:name, :address, :age)
john = Customer.new("John Doe", "123 Street, SE10JA", 20)
puts john.name # "John Doe"
puts john.age # 20
and we can make the same thing in Kotlin:
data class Customer(val name: String, val address: String, val age: Int)
val john = Customer("John Doe", "123 Street, SE10JA", 20)
println(john.name) // "John Doe"
println(john.age)  // 20
Those two are different constructs in the languages but they are the same abstraction, we wrapped multiple values inside one type, we can compare both types by value and access the values using dot notation. When we start to work and use those abstractions around we will start thinking about a Customer doesn’t matter what a customer is composed of, we can defer that to the moment that we really need some specific information. The example also shows that we can have abstractions in both kinds of languages.
Wrapping up and References
We could see the difference between type systems and how they work. We also spoke a little about abstractions, which we will cover more in the next part where we have started building using our type system more and more to help us to write an application. In case you want to know more about type systems I recommend you to go straight to these sources:
What To Know Before Debating Type Systems
Using the type system to ensure correct code
Type System - Wikipedia
An Introduction To Programming Type Systems
24 Oct 2019
When you are running software that is critical for your company you can’t have logs just for analysing things that happened some time ago, having the client tell you that your application is broken while you didn’t even know what was happening is a real problem. One of the ways to deal with that is using monitoring and logging.
Most applications will have logging, even if it is just a text file that will require the use of tools like grep or tail to see what’s going on. But that’s a very passive way to see the logs, as you have to take action, and probably you will only look at the logs when there’s something wrong. What you need is to have your logs tell you what is happening, and today we are going to build the first step for that.
By the title you already probably know that we are going to talk about the Elasticstack. My intention with this post is to provide the basics way to start collecting and analysing your logs without you having to deal with all the hardships that I went through.
The Elastic Stack
Before known as ELK, the Elastic Stack is a set of tools that help you to collect, structure, store, analyse and also helps to create actions for certain situations.
The Elastic Stack is composed of 4 components:
Kibana is the visualisation tool that reads data from ElasticSearch. You can create dashboards or make queries to ElasticSearch manually.ElasticSearch is the store for the logs. You can send logs from Beats or Logstash and it’s stored in an index. You can have multiple indexes to store data from multiple sources.Logstash is the app that takes care of the logs, you can parse the logs into more useful data and send it to ElasticSearch.Beats or Filebeat is a lightweight tool that reads the logs and sends them to ElasticSearch or Logstash. The only purpose of this tool is to read the log files, it can’t do any complex operation with it. If you need to do a complex operation then you can send that log to Logstash for it to parse it into the desired information.
Logstash
We are starting with Logstash since it’s how you collect and parse your logs (Yes, I mentioned Beats but you don’t need that to start).
Logstash is a log processor and retriever. The main feature of Logstash is to give structure to unstructured log files, there are three steps for processing a log:
- Input - Receiving or Fetching the log.
- Filter - Processing or filtering.
- Output - Sending the log to a permanent store.
Logstash can retrieve data not only from log files, but it can get data from multiple sources like:
- Text files
- Databases
- Shell commands
- Queues
- Http Requests
If you want to see all the input plugins that Logstash supports check the docs.
Right now, the inputs that I’ve been using and I will explain how to use are:
- Text files
- Databases
- Shell commands
Text File Input
One of the most common ways to store logs is in text files that sit somewhere in the machine, usually /var/log. Logstash has a plugin that reads the file and keeps watching for new lines just like tail -f.
To use the plugin it’s very straightforward, you just have to add the path of the file and Logstash will take care of the rest, don’t worry about rotating the files, the plugin knows how to deal with that too.
The usage of the file plugin is like this:
input {
  file {
    path => /var/log/app/realworld.log
    id => realworld
  }
}
In the way that we configured Logstash above, every line will be a log entry. But sometimes our logs are not that simple and we have things like Stack traces or we write JSON into the logs. In this case we need them to be together to make sense and that’s why Logstash provides codecs, which are a way to extend the input plugins. One of those codecs is Multiline.
For example, below we have the logs for an application that uses Spring and when we have a Stack Trace we want to group it just in one line.
2019-08-18 18:31:53.845 INFO 6724 --- [ main] o.s.t.web.servlet.TestDispatcherServlet : FrameworkServlet '': initialization completed in 17 ms
com.andre2w.transaction.TransactionTooOldException
  at com.andre2w.transaction.TransactionService.validateTimestamp(TransactionService.java:46)
  at com.andre2w.transaction.TransactionService.add(TransactionService.java:29)
  at com.andre2w.controllers.TransactionController.create(TransactionController.java:42)
  at sun.reflect.NativeMethodAccessorImpl.invoke0(Native Method)
  at sun.reflect.NativeMethodAccessorImpl.invoke(NativeMethodAccessorImpl.java:62)
  at sun.reflect.DelegatingMethodAccessorImpl.invoke(DelegatingMethodAccessorImpl.java:43)
  at java.lang.reflect.Method.invoke(Method.java:498)
2019-08-18 18:31:53.891 INFO 6724 --- [ main] o.s.b.t.m.w.SpringBootMockServletContext : Initializing Spring FrameworkServlet ''
2019-08-18 18:31:53.892 INFO 6724 --- [ main] o.s.t.web.servlet.TestDispatcherServlet : FrameworkServlet '': initialization started
So if we want to capture the Stack Trace from our logs we can do a simple regex to group everything starting with space.
input {
  file {
    path => /var/log/app/realworld.log
    id => realworld
    codec => multiline {
      pattern => "^\s"
      what => "previous"
    }
  }
}
But in this case we can go even further. As these logs are from an application using Spring and all the logs they follow a certain format, we can group everything that doesn’t match that format which will include stack traces, JSON and objects.
input {
  file {
    path => /var/log/app/realworld.log
    id => realworld

    codec => multiline {
      pattern => "\d{4}-\d{2}-\d{2} \d{2}:\d{2}:\d{2}\.\d{3} \w+ \d+ --- \[\s+\w+]"
      negate => true
      what => "next"
    }
  }
}
What does negate and what mean?
Negate is the option to define if you want to group lines where the regex does or doesn’t match. In the first example the field negate is omitted, so it has the default value False. negate => false means that lines will be grouped together when the regex IS matched. negate => true means that lines will be grouped together when the regex IS NOT matched.
The what is how Logstash will group the requests. previous means that the matched line will group with the previous line and next it’s pretty much obvious what it does.
Database
Since Logstash is running using Java, you have access to any database supported by JDBC. For Postgres, you can see the number of locks querying the table pg_locks.
The configuration for something like that would be:
input {
  jdbc {
    jdbc_connection_string => "jdbc:postgres://localhost:5432/main"
    jdbc_user => "postgres"
    jdbc_password => "postgres"
    jdbc_driver_class => "org.postgresql.Driver"
    statement_filepath => "/etc/logstash/queries/query-locks.sql"
    schedule => "* * * * *"
    tags => ["jdbc","staging-1","query-locks", "main"]
  }
}
The fields starting jdbc_ hold the information to connect to the database. Then we have statement_filepath, this points to the file with the query that you want Logstash to run, you can also use the statement option for more ad-hoc queries. Finally, we have the schedule option, this is the frequency that you want to run the query, the value is based on the Linux crontab, in this example it would be running every minute.
tags help you to identify the query that you are running. It’s just an array of strings, you can add anything.
Logstash will parse all the fields and send it to the datastore defined in the output.
Something to keep an eye on when using the JDBC input is that you need the jar in the Logstash classpath. In the Logstash install folder, you go to libs/jars and add the jar for the database driver.
Exec
Sometimes you might want to get a piece of data from a source that Logstash doesn’t support very well. In this case you can use the exec input plugin that executes a command-line application and gets the result as the logline.
input {
  exec {
    command => "/usr/bin/retrieve-data.sh"
    schedule => "* * * * *"
    tags => ["retrieve-data","staging"]
  }
}
This input is very straightforward to use, you have the options:
command: The shell command that you want to use.schedule: Same as the jdbc-input schedule is the frequency you want to run the command.tags: Information to identify the result later.
With this plugin you don’t have to worry about the result being multi-lined, Logstash will group everything in one line.
Filter
Lets say we are receiving data from all the inputs, but we need to transform that data in something useful. We don’t just want to have log lines but we want statistics to be able to see what is happening in real-time and transform the logs that we receive into properly structured data.
Grok Parser
In most cases the Grok Parser plugin is used. Most of the time the data from the logs is not in a structured format but we still need to parse this unstructured data and give some meaning to it. We can’t have numbers being strings if we want to sum something. Grok doesn’t structure the data by using regexes, Logstash has a set of built-in regexes that cover most cases.
Here’s an example of a filter.
We are receiving HTTP requests from the internet and we want to track which endpoints have the most requests, our log is structured in this following way:
192.168.0.1 GET /index
So we add a Grok filter to structure that:
filter {
  grok {
    match => {
      "message" => "%{IP:client} %{WORD:method} %{URIPATHPARAM:request}"
    }
  }
}
What is happening in that filter?
match is saying to check the message field of the logs that we receive and transform them into structured data.
So we have the request from the webserver:
I want Logstash to get the log and transform it into structured data (it’s a JSON, like everything nowadays). We make the matcher like:
"%{IP:client} %{WORD:method} %{URIPATHPARAM:request}"
The syntax for grok is %{PATTERN:field}
The pattern is how you want to match the field and what kind of regex will be used in the data and the field will be the field where that data is going to be stored (bit obvious). You can see all the patterns available here.
In the case that Logstash is unable to parse the pattern properly, it will add a tag called _grokparsefailure.
Since it’s just a bunch of regexes parsing data you can create your own patterns. For that, you need to create a folder named patterns inside the Logstash folder (you will need to check where is installed). The filename can be named anything you want, Logstash will read everything inside.
grok {
  match => {
    "path" => "/%{FILE_VERSION:version}_%{BU_ID:id}\.csv$"
  }
  patterns_dir => ["/elasticsearch/logstash/example/patterns"]
}
There’s also a way of having the files in a different folder and then declare this in the config file.
The contents of the file have to follow the pattern of PATTERN_NAME regex, so you would end with something like:
FILE_VERSION \w+\d{6}(?=_)
BU_ID \d{3}(?=\.)
If you are not planning to reuse the regex and want to inline it, you can do that too:
%{DATESTAMP:timestamp} (?<mti_before>\w{46})(?<mti>\w{4})%{GREEDYDATA}
Like a regex group you use parenthesis to specify what you want to group, then you start with a question mark to inform that you are going to use a regex. Then you add the name of the field that you are going to parse the data to and finally, you can add the regex.
Grok will also allow conversions to int and float. You just have to add as an extra parameter in the match. E.g.: %{IP:client:int}
When using the grok plugin take care to not duplicate the message that you are sending by adding the pattern:
grok {
  match { message => "%{GREEDYDATA:message}" }
}
This would add a new message to the message field instead of replacing.
JSON
You might be in a better situation and have structured your logs in a format like JSON. For that Logstash will give you free parsing.
json {
  source => "message"
  target => "payload"
}
That’s everything you have to do for Logstash to parse all the JSON messages and set the proper data type for the fields.
Key-Value
Another filter that might be useful is Key-Value or kv. It is used to split data based on two keys. So if we have a logline that looks like:
timestamp=10/09/2019 10:10:50, level=INFO, message=Something wrong might not be right
We can use the kv filter like this:
filter {
  kv {
    source => "message"
    field_split => ","
    value_split => "="
    target => "summary"
  }
}
So we can parse the data from the message using the kv filter. The only problem with this filter is that you can’t set the data type during the filter step.
Mutate
You might want to change the log that you are receiving, I’m not talking about full parsing of a logline but small changes. There’s the mutate filter to do that and there are multiple commands that can be used to change your log.
Some examples of what you can do with the mutate filter:
convert: You might have parsed a field but you need that field to be more than just a string. The convert command allows you to convert to integer, float, string, or boolean.
filter {
  mutate {
    convert => {
      "quantity" => "integer"
      "is_paid" => "boolean"
    }
  }
}
remove_field: You might want to drop some sensitive data from your logs, so you can use this command to remove it.
filter {
  mutate {
    remove_field => ["sensitive_data"]
  }
}
gsub: This is an option to replace values using a regex, you might want to obfuscate some data that isn’t relevant, you can use this option for that.
filter {
  mutate {
    gsub => [
      # field                   regex                      result
      "transaction_reference", "\d{4}-\d{4}-\d{4}-\d{4}", "XXXX-XXXX-XXXX-XXXX"
    ]
  }
}
This will replace all transaction references with a masked version.
Output
This is the part where you can direct the log that you just parsed to an output or datastore. In our case we are going to use Elasticsearch which is a NoSQL document store, but you can also send to other places like CSV, HTTP or even email.
You can check the documentation for Logstash to see all the output plugins.
output {
  elasticsearch {
    hosts => ["192.168.0.15"]
    user => "elastic_user"
    password => "elastic_password"
    index => "application-log"
  }
}
In the example here we are sending our logs to Elasticsearch hosted in another machine.
Elasticsearch
Elasticsearch is a search analytics engine that does the job of collecting and aggregating the stored data. It also provides a real-time search for all kinds of data be that structured or unstructured text, or numerical data.
All the data in Elasticsearch is stored in the JSON format and then indexed which enables you to immediately search it. Each stored document is a collection of key-value pairs that contain the data and it’s stored in an optimised data structure that helps searching it later.
Basic constructs
Nodes
Nodes are one of the most basic constructs that stores and indexes the data. There are multiple types of node.
- Master node: This controls the cluster
- Data node: This holds the data and performs CRUD operations, aggregations and searches.
- Ingest node: This transforms and enriches the data before indexing.
Index
An index is a collection of documents with similar characteristics, they are like tables in a relational database.
The Indexes are more flexible than a relational database, since they are lightweight you can create multiple indexes without much difficulty. In logging for example, you can create an index for each day and have the type to be the kind of log that you have.
Every day a new index will be created, you wouldn’t do that for a relational DB.
Using Elasticsearch
There are two main things that we have to pay attention to when working with Elasticsearch. They are templates and policies.
Templates
Templates could be considered the schema of your index, Elasticsearch can set a default schema, but you need more control of it if you want do make aggregations and calculations in the data that you have.
Which types does Elasticsearch support? The main data types supported are:
- String
- Numeric (long, int, short, double, float)
- Date
Building templates
How do I set up my template? Well, Elasticsearch has a REST-like API that you can easily interact with.
We are adding logs for an application for a Fintech company and we want to monitor the funds transfers that we are making. The payload that we have for transfers is:
{
  "paymentDate": "2019-09-14 11:25:32.321",
  "amount": 100.00,
  "message": "Payment message",
  "origin": {
    "sortCode": "11-11-11",
    "account": "838383"
  },
  "destination": {
    "sortCode": "11-11-11",
    "account": "1313123"
  }
}
We start building our template with the payment_date field and we can set the type as date and give the format for the field:
"payment_date": {
  "type": "date",
  "format": "yyyy-MM-dd HH:mm:ss.SSS"
}
Then we have the amount, we add this field with the type scaled_float and the scaling_factor to be 100 so Elasticsearch can handle two digits in the decimal part making life a little easier for our searches later:
"amount": {
  "type": "scaled_float",
  "scaling_factor": "100"
}
Then we have the field message which is just a string, so we are going to use the text type which creates a field that is indexed for full text search:
"message": {
  "type": "text"
}
The origin and destination fields are virtually the same and they always have the same format, so we can use the keyword type. This type is good for small amounts of semi-structured data like postal code, addresses, emails, sort codes and account numbers:
"origin": {
  "properties": {
    "body": {
      "properties": {
        "sort_code": {
          "type": "keyword"
        },
        "account": {
          "type": "keyword"
        }
      }
    }
  }
}
Now we have the full mapping for the index we can insert that to Elasticsearch. We just make a PUT request to it.
curl -X PUT "http://elasticsearch.com/_template/transfers_template" -d @transfers_template.json
{
  "index_patterns": [
    "transfers-*"
  ],
  "mappings": {
    "_meta": {
      "beat": "transfers",
      "version": "7.0.1"
    },
    "date_detection": false,
    "dynamic_templates": [
      {
        "labels": {
          "mapping": {
            "type": "keyword"
          },
          "match_mapping_type": "string",
          "path_match": "labels.*"
        }
      },
      {
        "container.labels": {
          "mapping": {
            "type": "keyword"
          },
          "match_mapping_type": "string",
          "path_match": "container.labels.*"
        }
      },
      {
        "fields": {
          "mapping": {
            "type": "keyword"
          },
          "match_mapping_type": "string",
          "path_match": "fields.*"
        }
      },
      {
        "docker.container.labels": {
          "mapping": {
            "type": "keyword"
          },
          "match_mapping_type": "string",
          "path_match": "docker.container.labels.*"
        }
      },
      {
        "kibana.log.meta": {
          "mapping": {
            "type": "keyword"
          },
          "match_mapping_type": "string",
          "path_match": "kibana.log.meta.*"
        }
      },
      {
        "strings_as_keyword": {
          "mapping": {
            "ignore_above": 1024,
            "type": "keyword"
          },
          "match_mapping_type": "string"
        }
      }
    ],
    "properties": {
      "@timestamp": {
        "type": "date"
      },
      "payment_date": {
        "type": "date",
        "format": "yyyy-MM-ddTHH:mm:ss.SSSSSS"
      },
      "amount": {
        "type": "scaled_float",
        "scaling_factor": "100"
      },
      "message": {
        "type": "text"
      },
      "origin": {
        "properties": {
          "body": {
            "properties": {
              "sort_code": {
                "type": "keyword"
              },
              "account": {
                "type": "keyword"
              }
            }
          }
        }
      },
      "destination": {
        "properties": {
          "body": {
            "properties": {
              "sort_code": {
                "type": "keyword"
              },
              "account": {
                "type": "keyword"
              }
            }
          }
        }
      }
    }
  }
}
Policies
This feature is only available in the premium versions of Elasticsearch.
The indexes are going to be bombarded with data the entire time and just like log files, we need a rollover policy to not get our disks full. In the premium version of Elasticsearch, we have the Index Policies tools to help us manage that.
The first thing to know is what are the states that an Index can be.
hot: Is the index that we are writing in.warm: Is an index that we are querying frequently, but not writing in.cold: Is an index that we don’t write to anymore and we also don’t query the data very often.delete: Is an index that is no longer needed and can be deleted.
An index starts at the hot state and we can say to Elasticsearch when we don’t want to keep writing in an index anymore. We tell it to start to use another index using the max_age and the max_size options. In the example below, we are making a new index every day or when it reaches 5GB (the number was arbitrarily chosen).
{
  "policy": {
    "phases": {
      "hot": {
        "actions": {
          "rollover": {
            "max_age": "1d",
            "max_size": "5GB"
          }
        }
      }
    }
  }
}
We don’t want to keep all the indexes hot, so we can start to change the state of our older indexes and make them warm. The policy to define what is going to the warm state starts with the min_age parameter, which sounds very obvious what it does. In our case we are setting the min_age to 7d, so all the hot indexes that are seven days or older are going to be converted to a warm index.
For warm indexes we have some options that weren’t previously available in the hot one, the actions section allows us to do some changes when changing the state of the index.
The first one that we can see is forcemerge this option, when set to 1, tells Elasticsearch to merge all the indexes that are going from hot to warm. This is helpful because in Elastisearch when you delete a document, that document isn’t really deleted, but only marked has deleted. During the merge the documents marked as deleted are going to be properly deleted, like you would send the files to the Trash bin and then delete them from your system later.
Then we have shrink which is used to reduce the number of shards of an index. Since we are not writing in that index anymore we don’t need all shards that we allocated previously.
And finally we have allocate. Here we can set the number_of_replicas, in case we need the data to be highly available, also it’s more secure than having only one shard.
"warm": {
  "min_age": "7d",
  "actions": {
    "forcemerge": {
      "max_num_segments": 1
    },
    "shrink": {
      "number_of_shards": 1
    },
    "allocate": {
      "number_of_replicas": 2,
      "require": {
        "data": "warm"
      }
    }
  }
}
For data that is even older than what we set for the warm state and that we are just storing for security reasons, we can turn their indexes to cold. We set to every index older than 6 months to be set to cold and we freeze them. The advantage of having the freeze in this step is that Elastisearch don’t use extra memory for frozen indexes.
"cold": {
  "min_age": "180d",
  "actions": {
    "freeze": {}
  }
}
Finally, there is the deletion of the index that is quite straight forward.
"delete": {
  "min_age": "365d",
  "actions": {
    "delete": {}
  }
}
The final policy that we have would look like this:
{
  "policy": {
    "phases": {
      "hot": {
        "actions": {
          "rollover": {
            "max_age": "1d",
            "max_size": "5GB"
          }
        }
      },
      "warm": {
        "min_age": "7d",
        "actions": {
          "forcemerge": {
            "max_num_segments": 1
          },
          "shrink": {
            "number_of_shards": 1
          },
          "allocate": {
            "number_of_replicas": 2,
            "require": {
              "data": "warm"
            }
          }
        }
      },
      "cold": {
        "min_age": "100d",
        "actions": {
          "freeze": {}
        }
      },
      "delete": {
        "min_age": "365d",
        "actions": {
          "delete": {}
        }
      }
    }
  }
}
Beats
FileBeat
Filebeat is a lightweight tool that reads the logs and sends them to ElasticSearch or Logstash. The only purpose of this tool is to read the log files, it can’t do any complex operation with it. If you want to perform complex operations then you can send the log to Logstash and parse into the desired information.
When you have multiple servers and you don’t want to install Logstash in all the machines because it’s a heavy application, you can use Filebeat as it’s written in Go, is natively compiled and it’s very lightweight.
It’s not too hard to configure Filebeat since it doesn’t do much. You have the filebeat.yml that contains the configuration:
filebeat.config.inputs:
 filebeat:
 inputs:
  - type: log
 paths:
  - "/var/log/applog/*.log"

 output:
 logstash:
 hosts: ["logstash:5043"]
We can see the inputs part that reads the logs from a folder and sends to an output in Logstash that is hosted elsewhere. In this configuration file, we are reading logs from the folder applog. You can also use the glob patterns in the paths to get multiple files or to capture differences like upper or lower case letters.
Multiline string
When working with Filebeat you might need to read multiline strings. Just like Logstash you can use the multiline options in the configuration to read the file, all the same fields for Logstash are applied for Filebeat.
filebeat.config.inputs:
  - type: log
    paths:
      - "/var/log/applog/application.log"
    multiline:
      pattern: "\\[\\d{2}\\/\\d{2}\\/\\d{4} \\d{2}:\\d{2}:\\d{2}]\\[\\w{2}\\]"
      negate: True
      match: after
| [How Filebeat works |
Filebeat Reference [7.1] |
Elastic](https://www.elastic.co/guide/en/beats/filebeat/current/how-filebeat-works.html) |
Fields
You can also add extra information to the logs that you are reading so you can identify the files that the data has been obtained from for use at a later date.
filebeat.config.inputs:
  - type: log
    paths:
      - "/var/log/applog/application.log"
    fields:
      file_name: "application_log"
    multiline:
      pattern: "\\[\\d{2}\\/\\d{2}\\/\\d{4} \\d{2}:\\d{2}:\\d{2}]\\[\\w{2}\\]"
      negate: True
      match: after
Autoreload
You can also split the input list from the configuration file and by doing that you can update the file with the inputs without restarting Filebeat. So instead of adding the inputs straight away in the main config file we provide the to the file with the inputs configuration.
filebeat.config.inputs:
  enabled: true
  path: inputs.yml
  reload.enabled: true
  reload.period: 10s
The inputs.yml that Filebeat is going to load:
- type: log
  paths:
    - "/var/log/haproxy.log"
  fields:
    file_name: "Haproxy"
Kibana
Up to this point we are collecting, structuring and storing all those logs. Now we need to get some value from them. Just having them stored isn’t the best option, we need to visualise them to have some feedback.
For visualising all the data that was stored to Elasticsearch you can use Kibana. It’s an application that allows you to query the data from Elasticsearch and create visualisations based on that.
In the Kibana home we opted to connect to an Index in Elastisearch using a pattern to specify the name of the index like logs-* so we can search all indexes starting with logs- since we might have grouped our logs by day and not with everything in one index.
Discovery
The Discovery area allows you to visualise and search data stored in Elastichsearch.
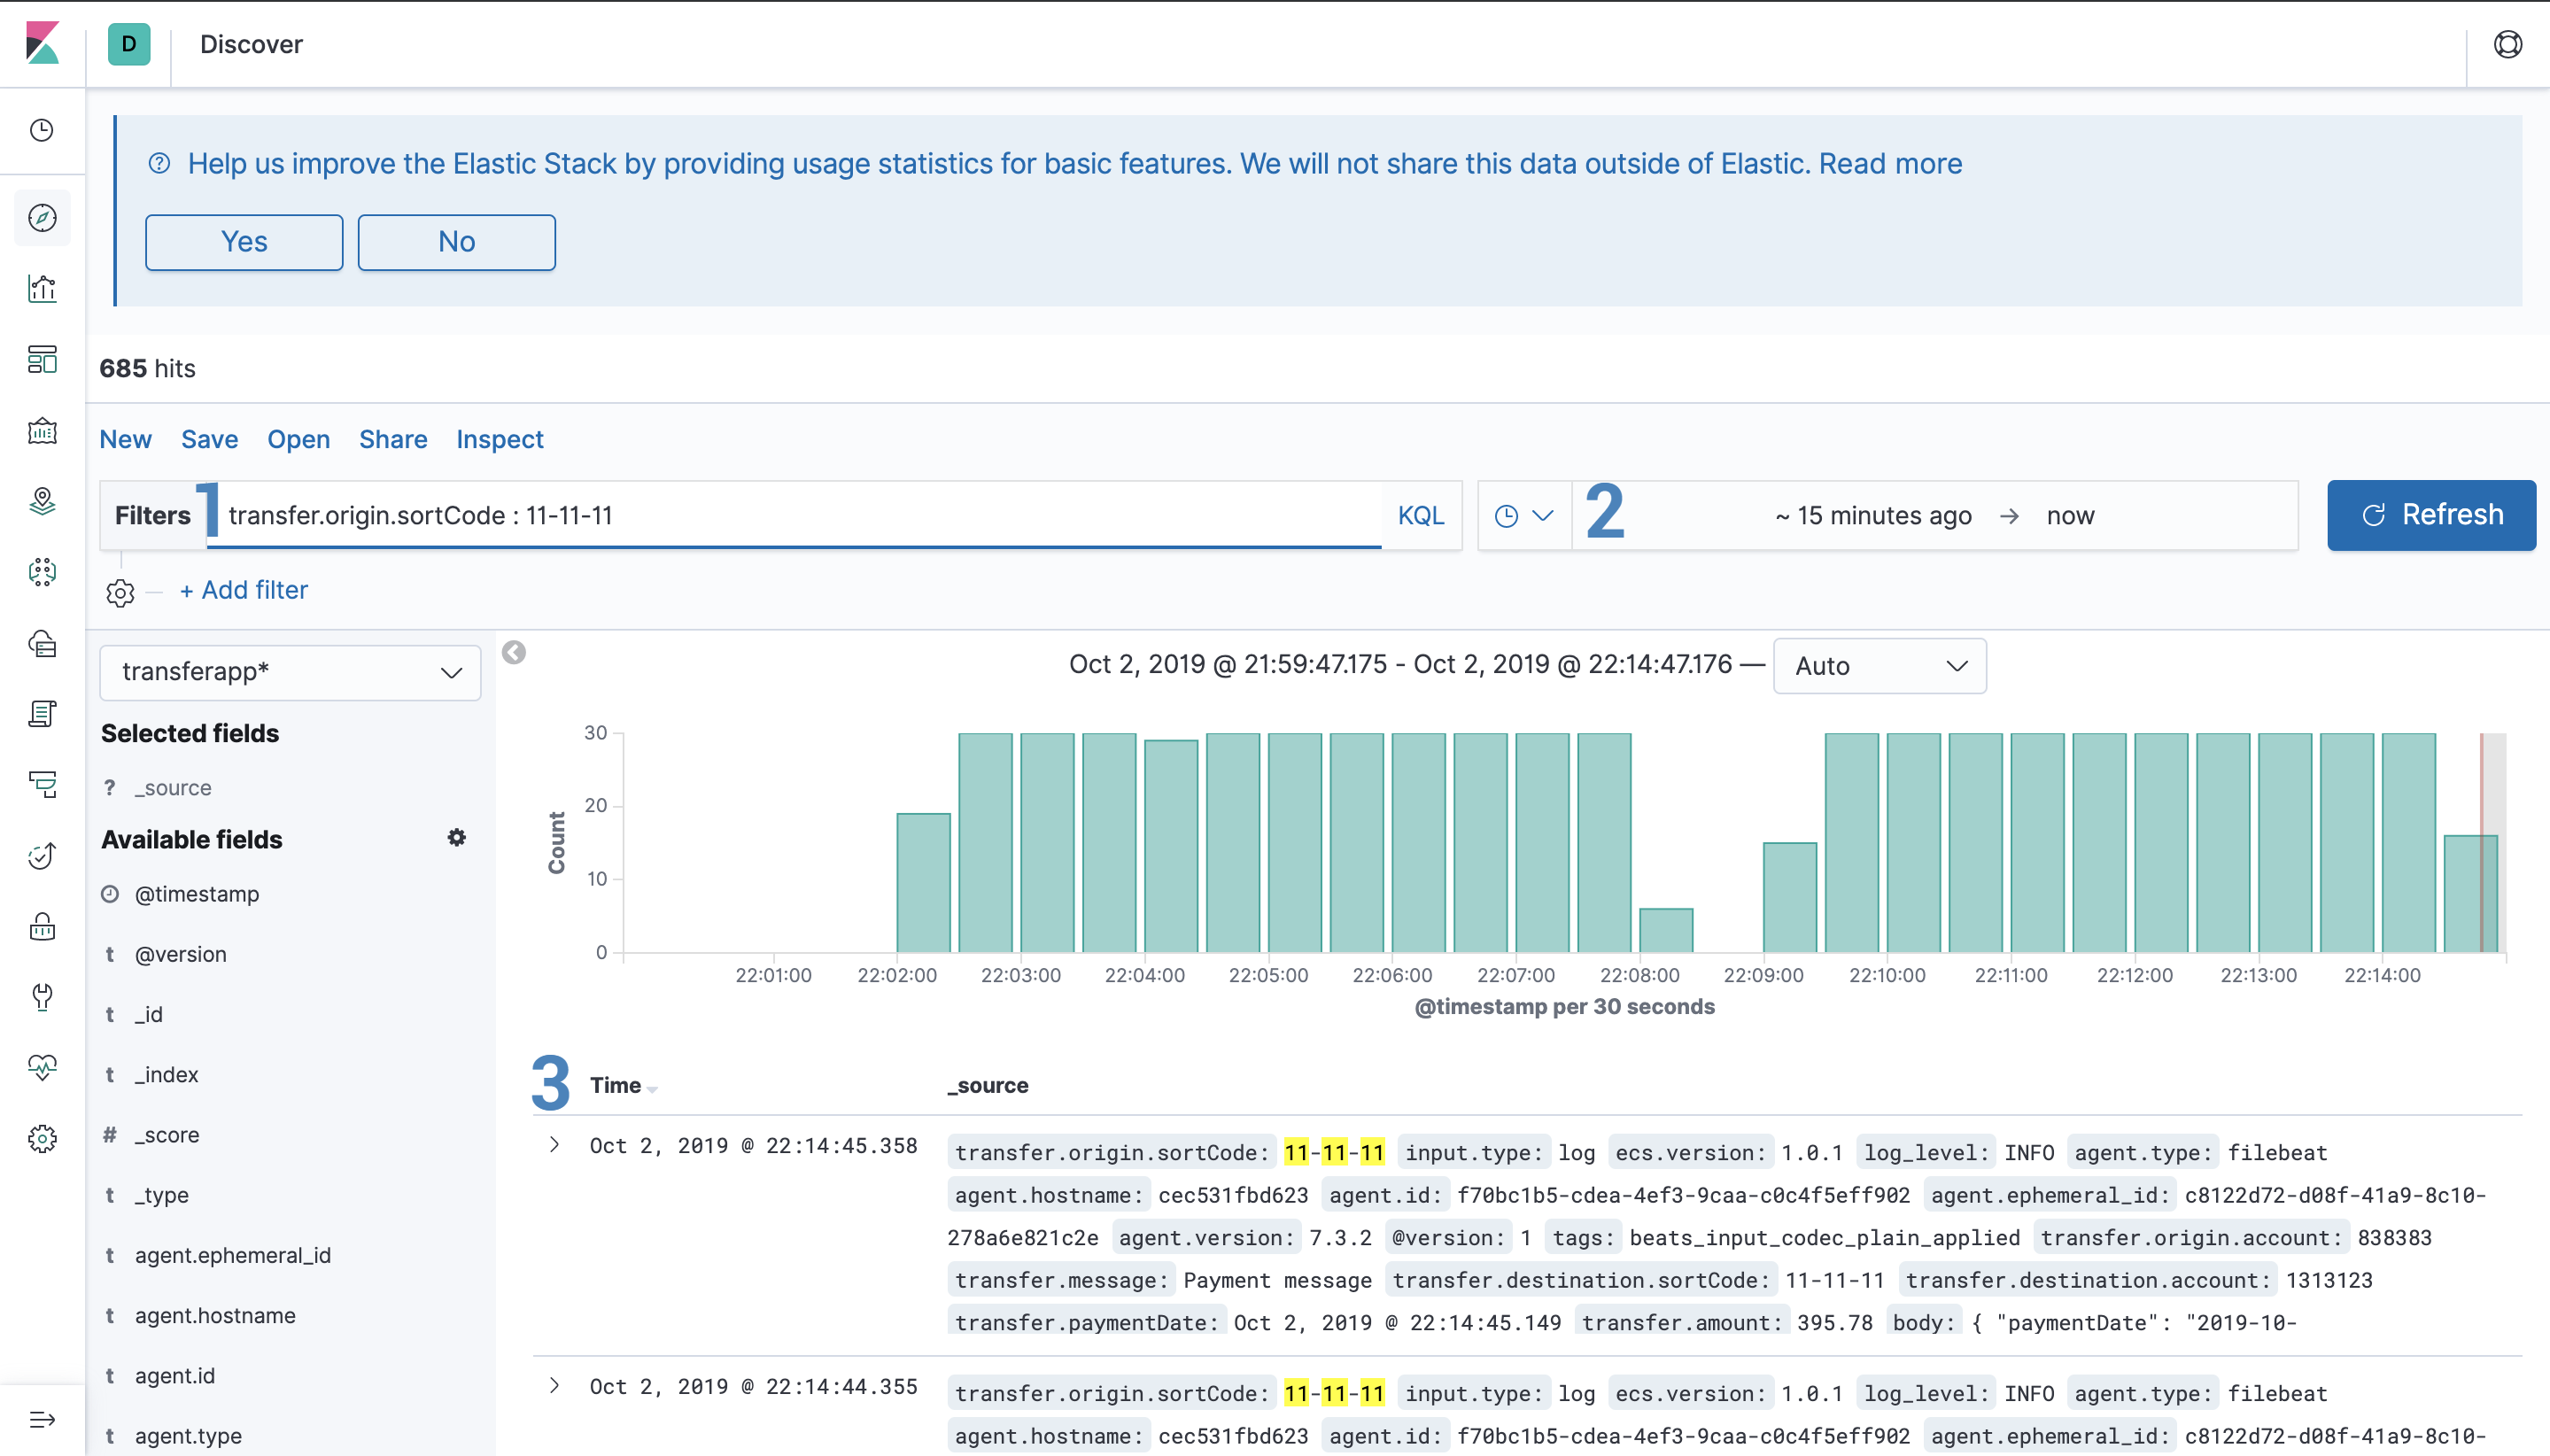
1 - Filters
You have a bar where you can write your queries using KQL which is a custom query language that is quite easy to use. Kibana will help you to auto-complete the query too.
So if we want to search you can just type:
tags: "retrieve-data" and stats1 >= 10000
Or you can use the filters section where you have a more UI oriented way to make your searches.
You can also save your searches for later so you don’t have to rewrite every time. The saved searches can be used in other parts of the Kibana UI.
2 - Date filters
In case you want to filter the results by a specific period, the filter allows you to use two options:
- Absolute: You can set the exact date and time that you want.
- Relative: You set a date and a timestamp that you want, like
10 minutes ago. With this option, you can also set to get the latest data from Elasticsearch.
3 - Records
You can expand and see records in a key-value way and it also shows the type of the field, which can be three:
t - Text field# - Numeric field- Clock Symbol - Date time
You can also filter which fields you want to see by selecting them in the Available Fields menu on the left
Visualise
We need a way to visualise all that data that is stored nicely, and Visualise allows us to create multiple kinds of graphs.
Y-Axis
In this example we are creating a bar graph. In the left menu you can set the options to create a graph.
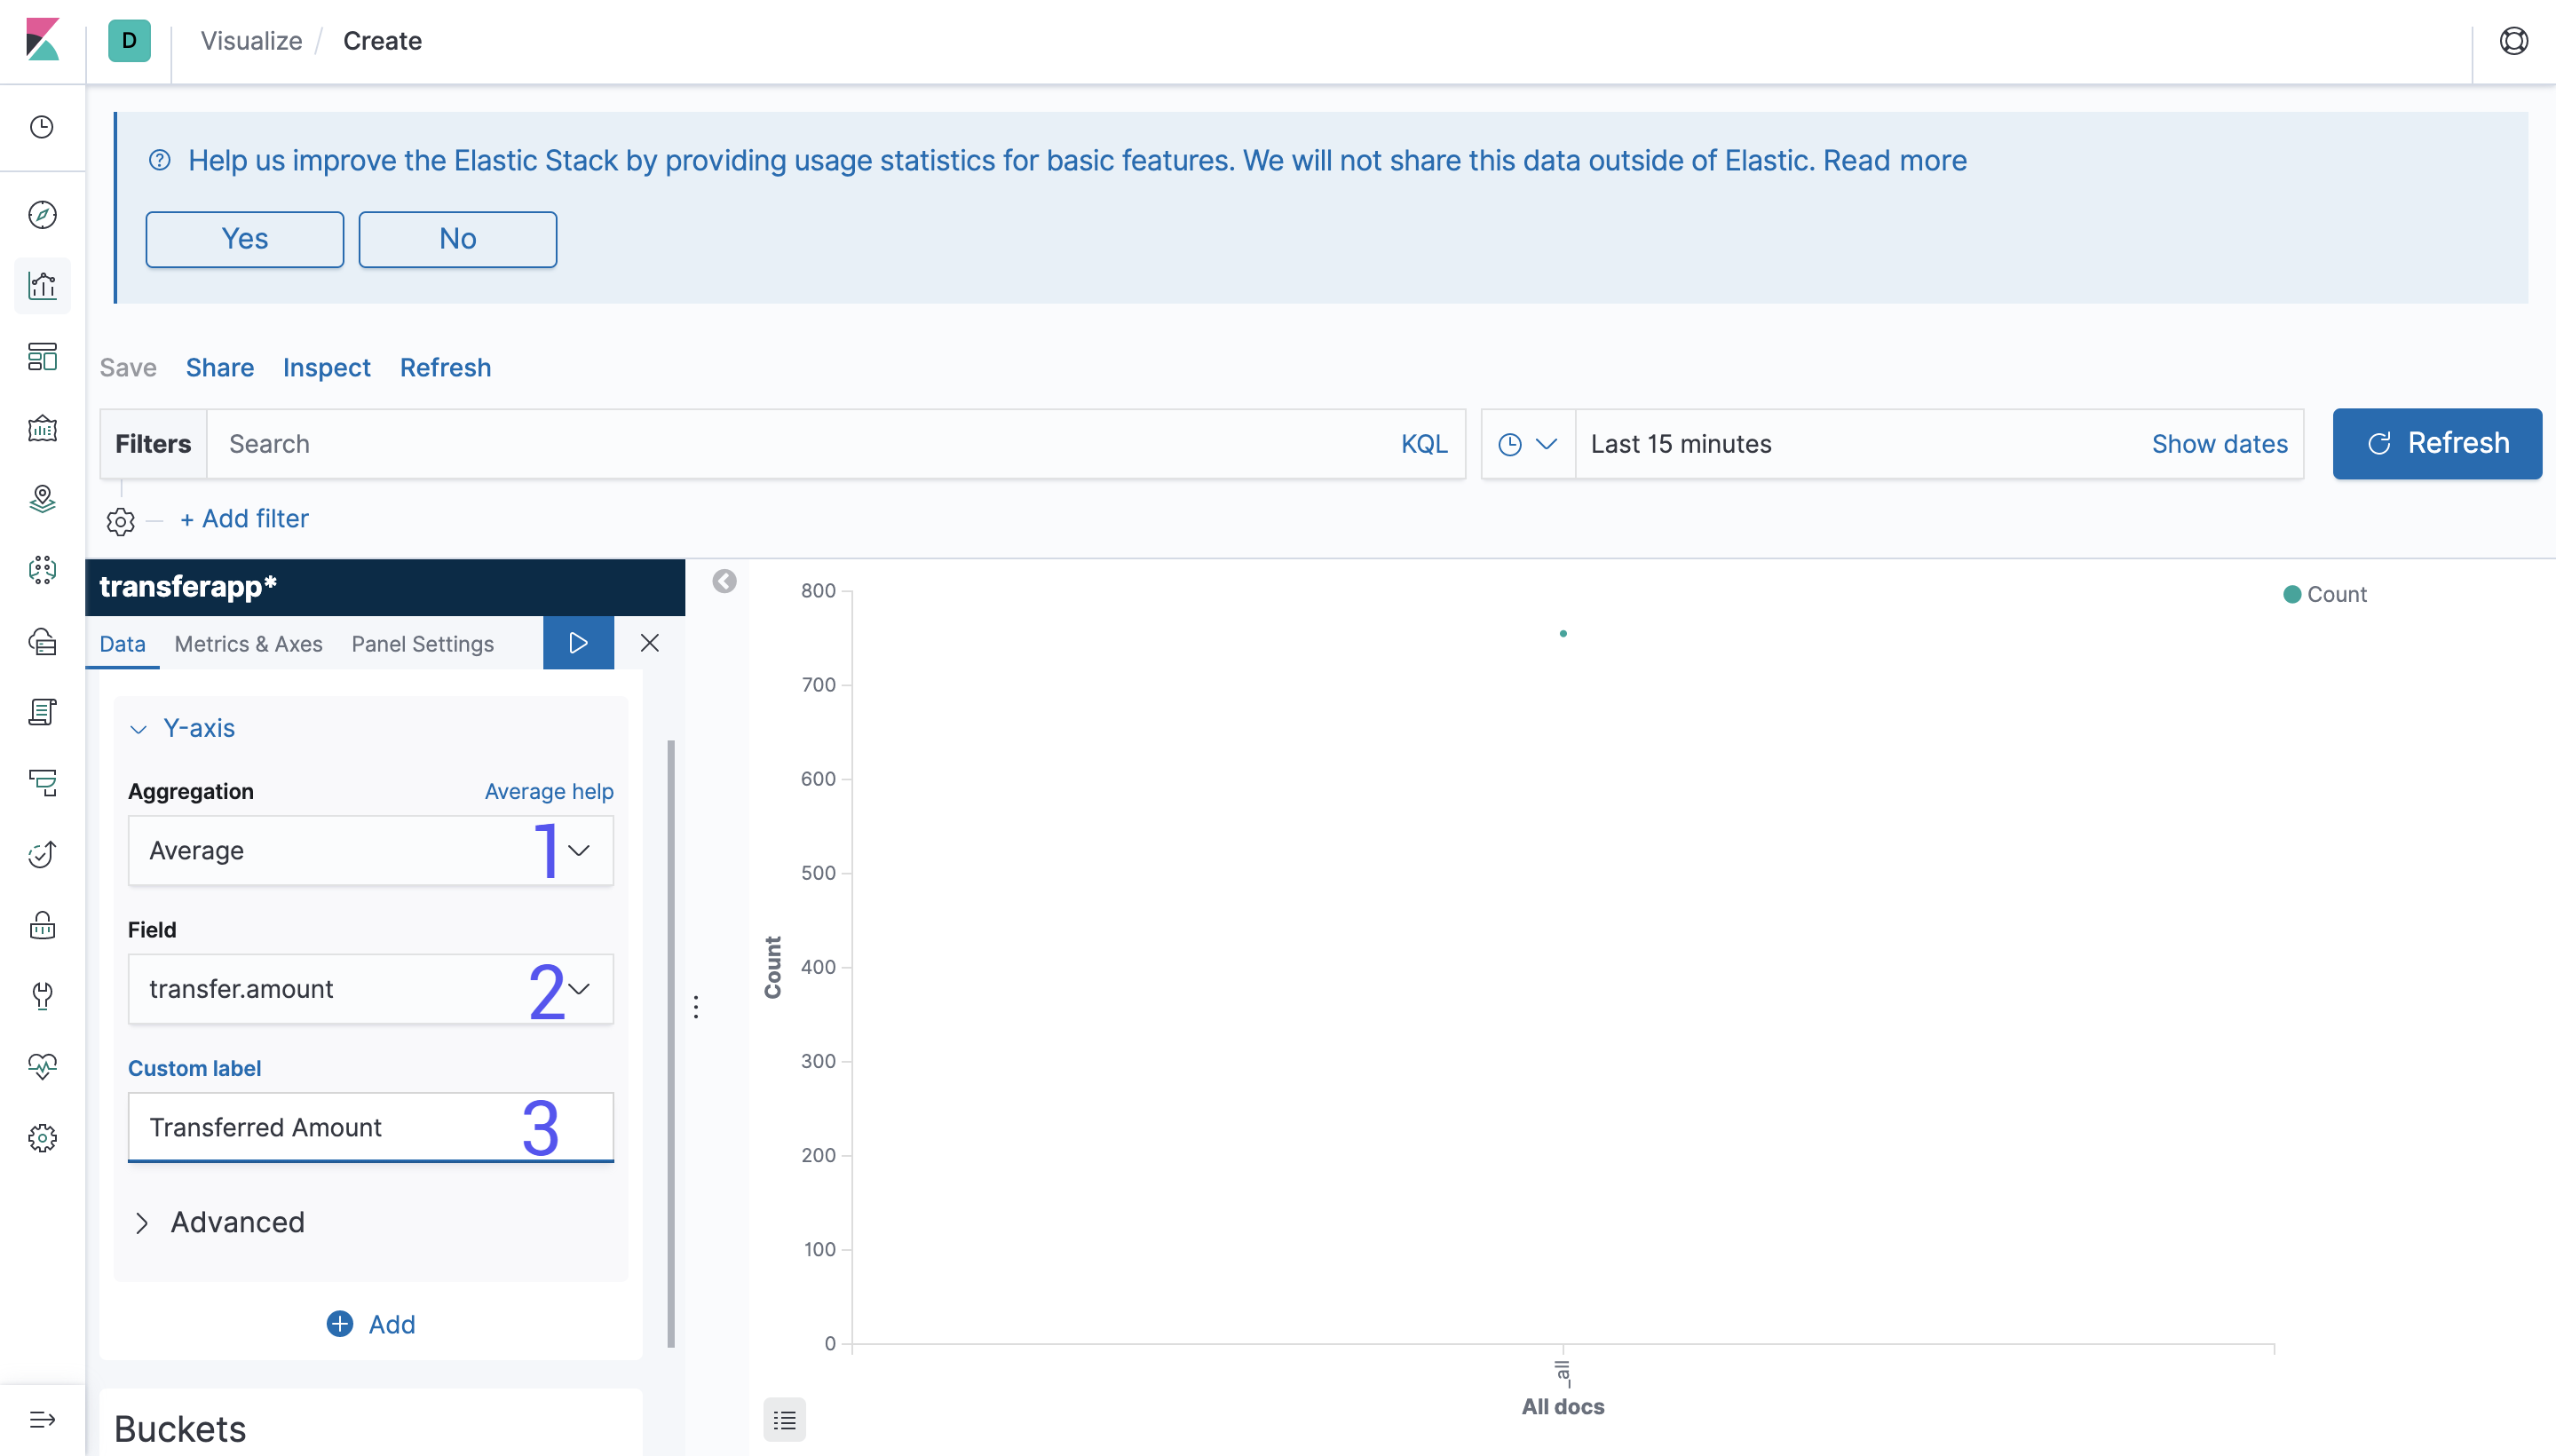
Aggregation: Is the kind of operation that you want to perform, which can be operations count, sum and average. There are also more complex operations like Standard Deviation and operations using other values.Field: Is the field that you want to use to make the calculation and the value to be displayed. For simple aggregations you can select the field straightway from the dropdown and for more complex queries you can use QueryDSL and JSON to find the values.Custom Label: You probably don’t want to display your data without meaning, so here you can add a nice label for it.
Buckets
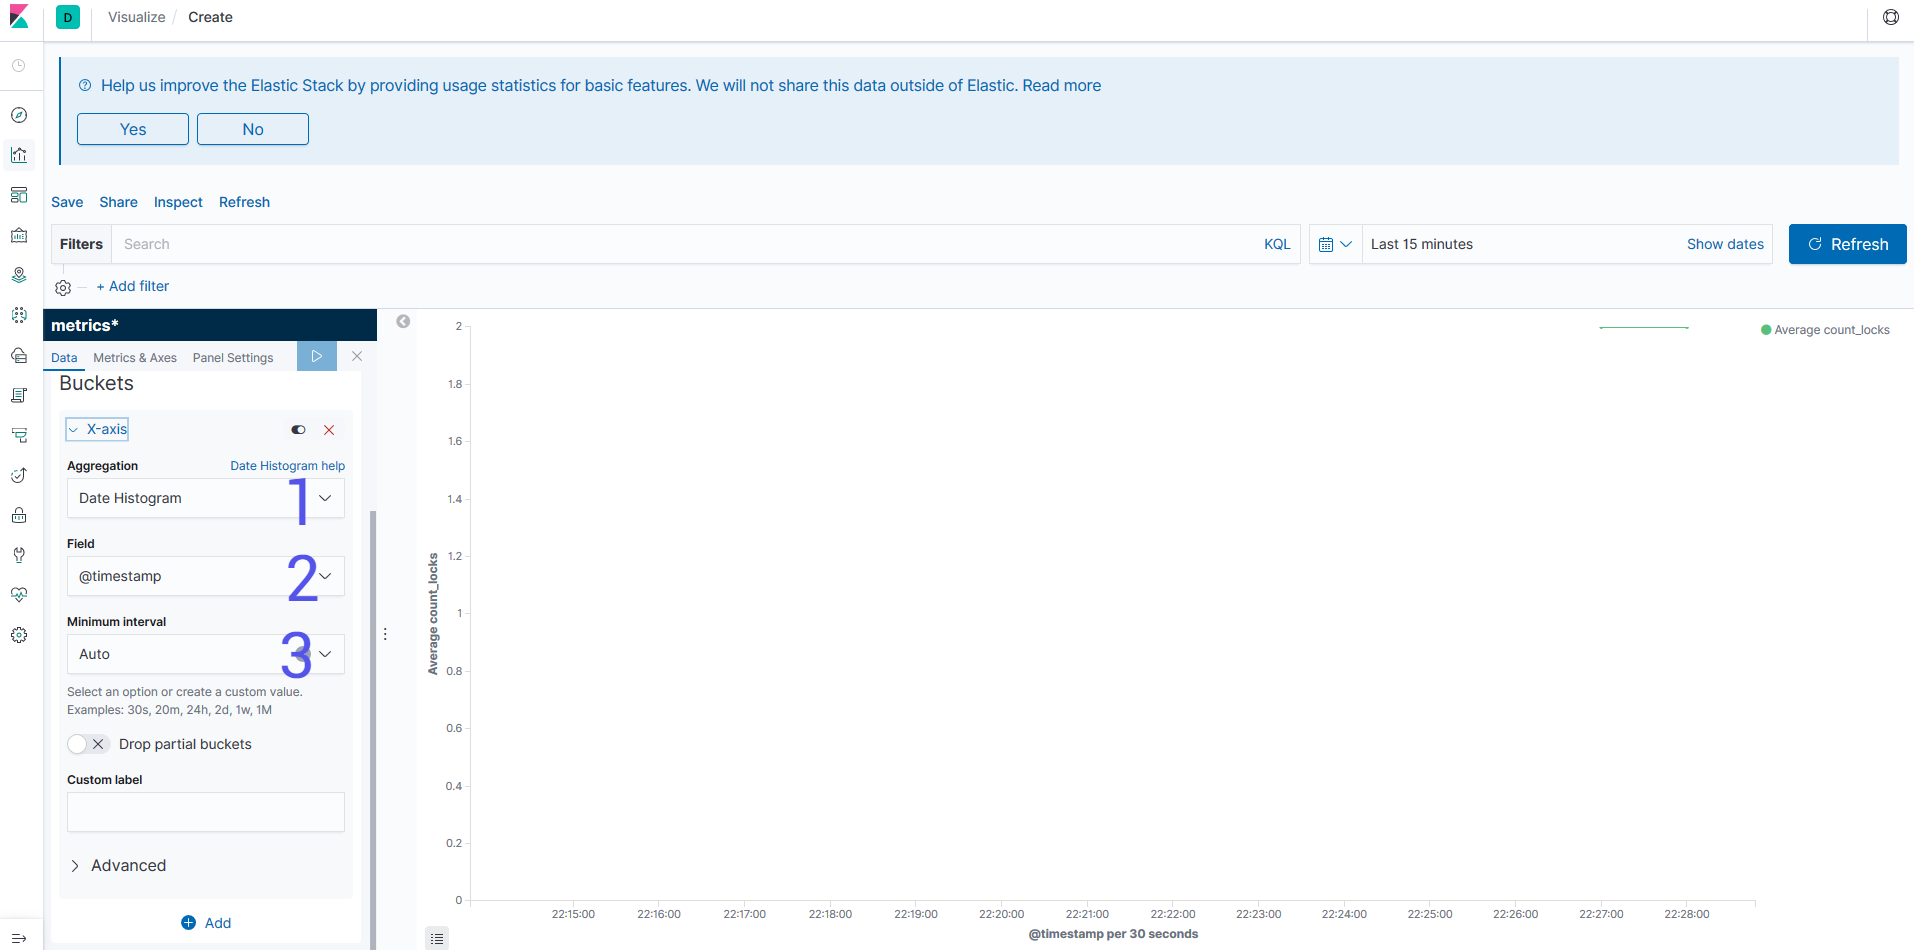
Aggregation: Is how your are going to group your data. You might want a time using the Date Histogram or something to group the endpoints that you have using a specific field.Field: Is the field that you are going to use to split the data. In case you need a more complex aggregation, you will be able to use the QueryDSL as an input.Interval: In case you want to group by the date you can specify the time period that you want to split the data. For other aggregations like ranges you get different interval fields.
Dashboards
Now we can put together the visualisation that we built into Dashboards, so we can aggregate all the data that we want to see into one place. You can add the visualisations that you created and resize them to fit the screen the way you want. Also you can change the search for them and even have them in full screen to be displayed really nicely.
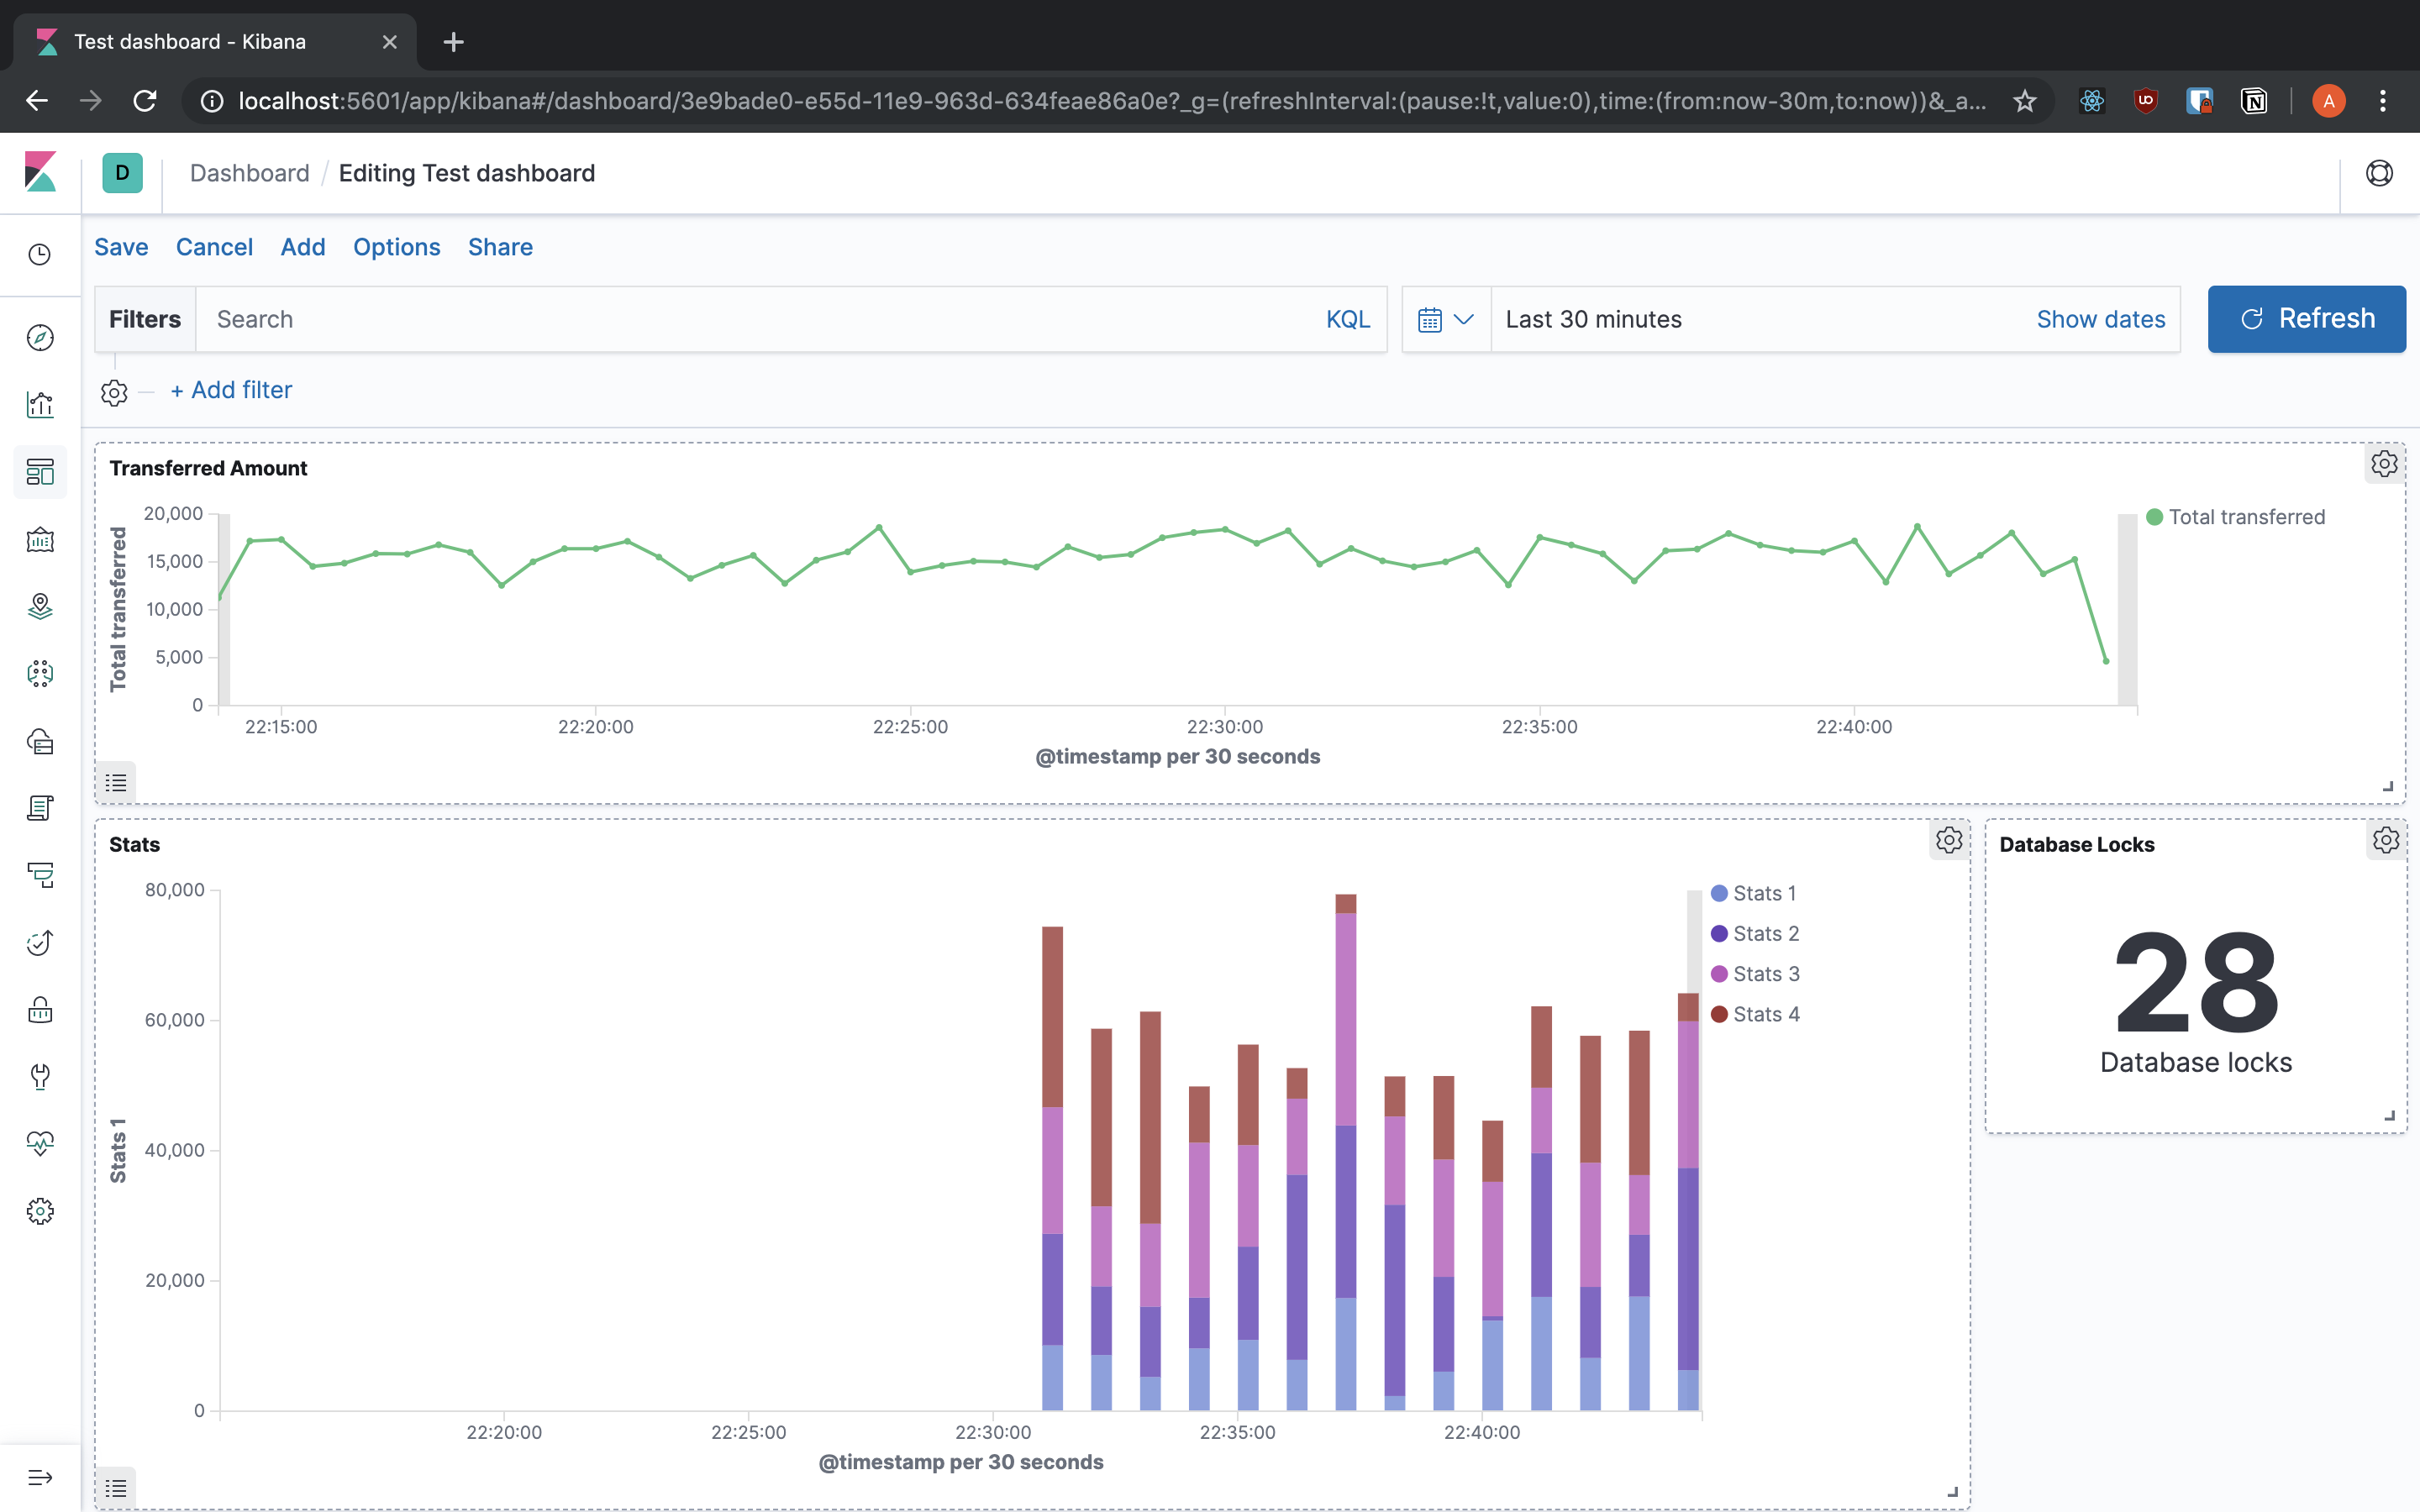
Kibana also provides you with the Dev Tools sections that have some tools to help your work.
Console
We saw that Elasticsearch has a REST-like API, well the console provides an easy way to interact with the API. Providing auto-complete and connecting straight away to Elasticsearch so you don’t have to build the entire request by hand. You can make a request just by having the method and the path, you can also write JSON with verification and completion.
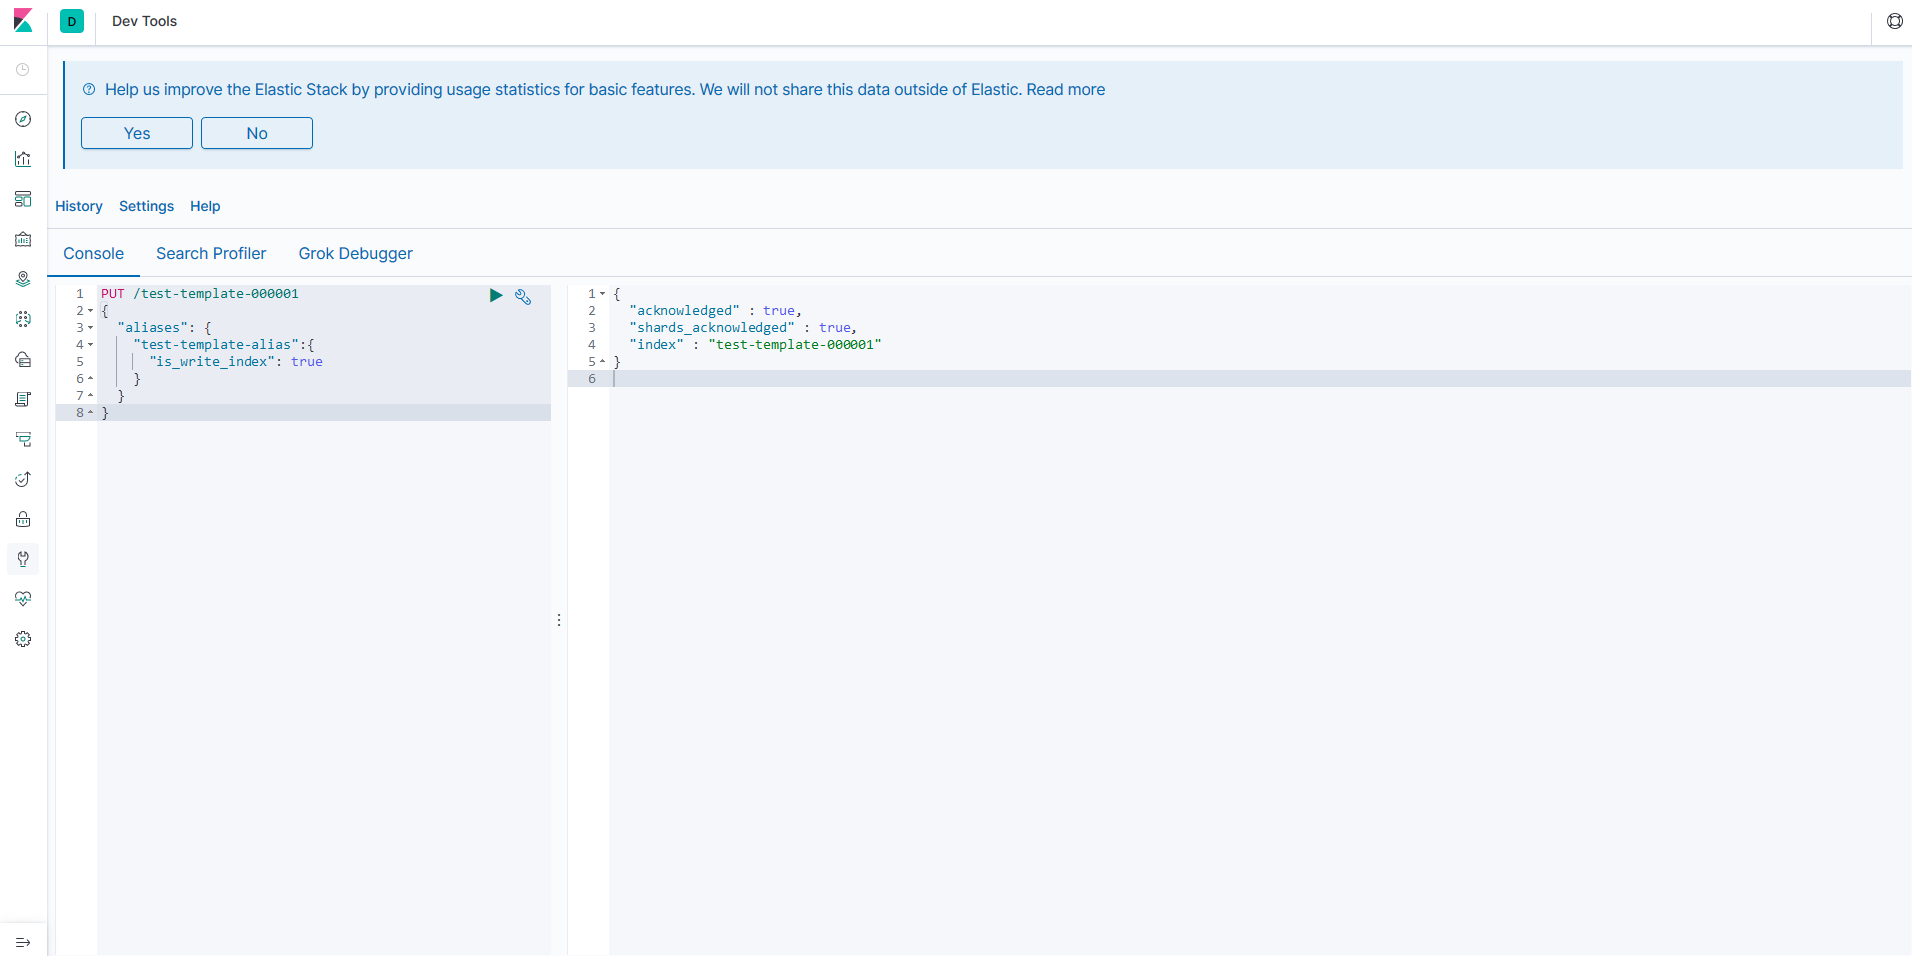
GET _template/transfers_template
PUT /test-template-000001
{
  "aliases": {
    "test-template-alias": {
      "is_write_index": true
    }
  }
}
Grok Debugger
When we were talking about Logstash we saw the Grok plugin and how powerful it can be, but Grok works using regexes, and everyone knows that regexes are complete madness and very easy to break, so the debugger helps us to build the patterns to parse our log lines.
We have the message getting the stats from our server, there are four columns, but we have to split into proper fields so we use the Grok parser for that.
16765 | 10475 | 26017 | 27583
%{NUMBER:stats1} \| %{NUMBER:stats2} \| %{NUMBER:stats3} \| %{NUMBER:stats4}
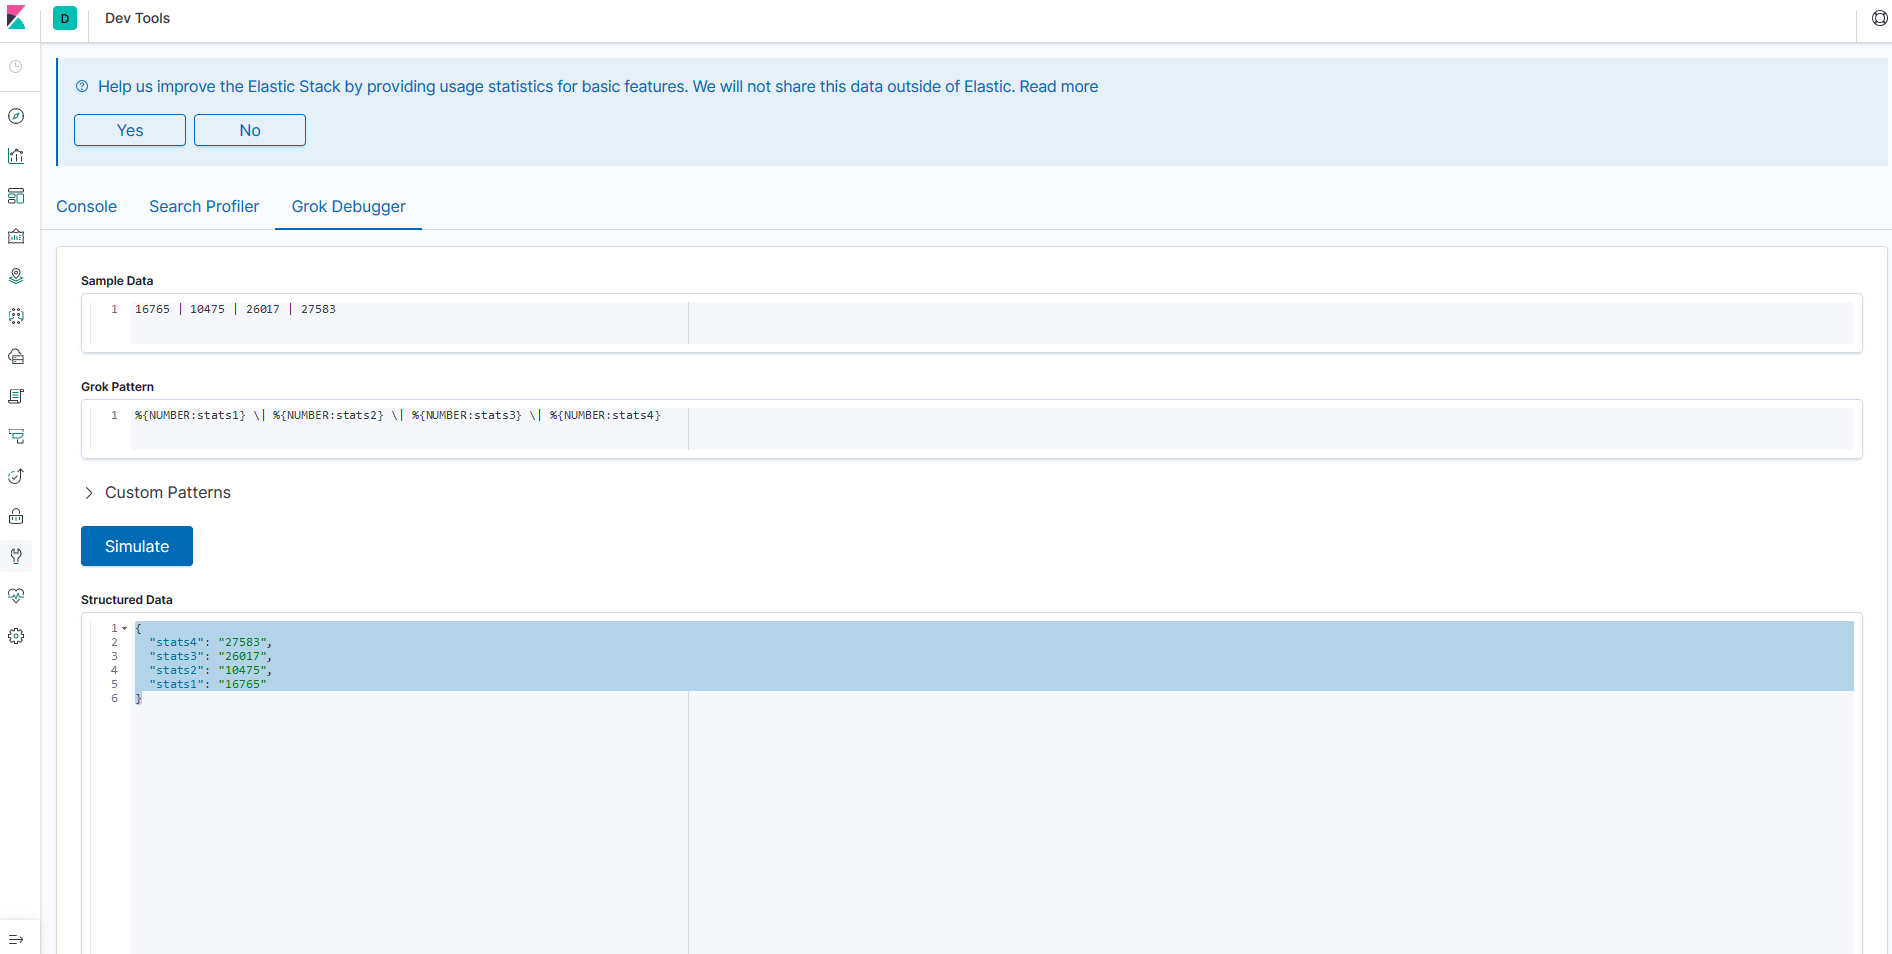
That’s all for today
In this post we saw the components of the Elastic Stack, how to start using them and the importance of having your logs organised. Also you can always resort to the Elastic Stack documentation here to see what other functionality is supported that isn’t mentioned in my post.